> ## Documentation Index
> Fetch the complete documentation index at: https://docs.goframe.dev/llms.txt
> Use this file to discover all available pages before exploring further.
# Animate clips with presets and keyframes
> Give clips an entrance and exit with Animate presets, then keyframe opacity, position, rotation, scale and volume with easing and timeline lanes
Animation in GoFrame Editor comes in two layers. **Animate** presets give a clip a ready-made entrance and exit in two clicks. **Keyframes** let you set exact values at exact times for a handful of properties, for a slow zoom, a drifting title or a custom fade. Both live in the [Inspector](/editor/inspector) and both can be applied by the agent from a prompt.
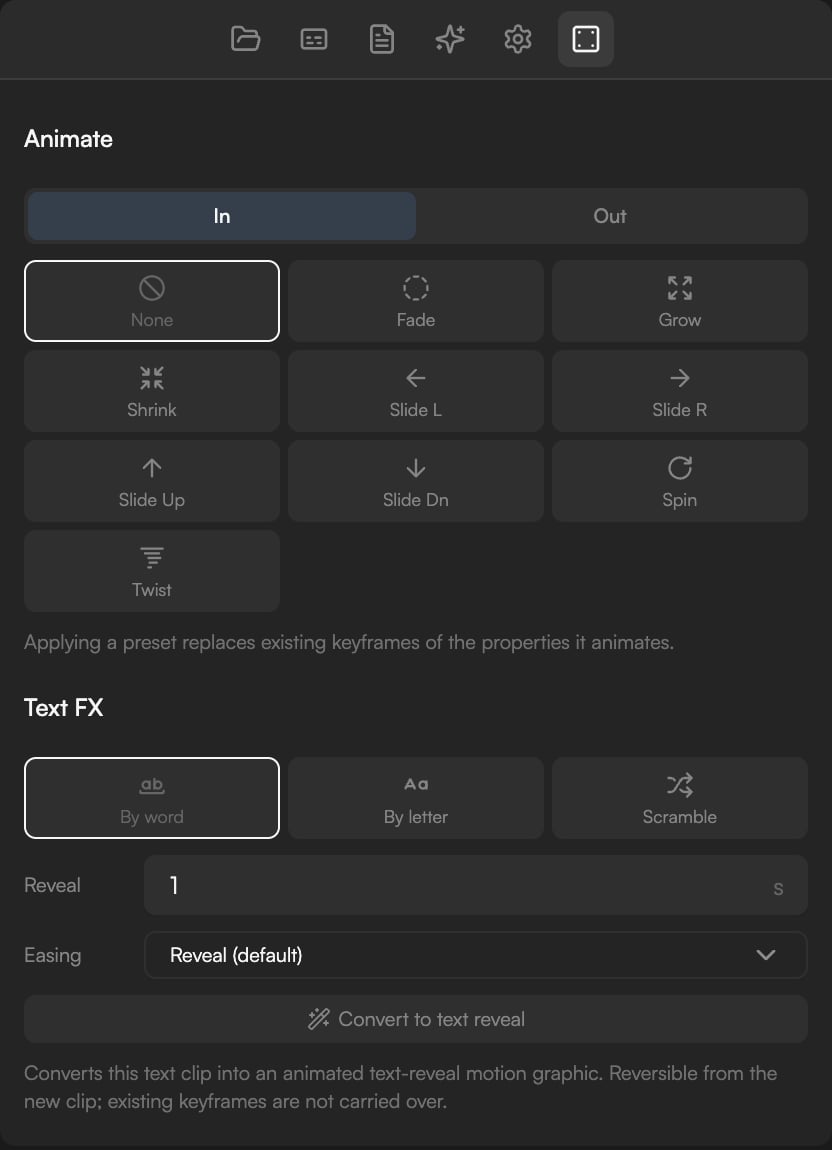 ## Animate presets
Select a clip and find **Animate** in the Inspector. It has two tabs, **In** (how the clip appears) and **Out** (how it leaves), each with its own preset grid:
| Preset | What it does on the way in (Out plays it in reverse) |
| --------------------------- | --------------------------------------------------------------- |
| **None** | No animation |
| **Fade** | Opacity rises from transparent to the clip's opacity |
| **Grow** | Scales up into place |
| **Shrink** | Scales down into place |
| **Slide L** / **Slide R** | Moves in from the left or right while fading in |
| **Slide Up** / **Slide Dn** | Moves in from the top or bottom while fading in |
| **Spin** | Rotates into place while scaling up |
| **Twist** | Settles into place with a slight rotation and scale |
| **Gain** | Audio clips only: volume rises from silence to the clip's level |
Video, image, text and shape clips show the visual presets. Audio clips show **Gain**, which is the audio fade.
Under the grid:
* **Duration** is the length of the animation, from 0.1 to 5 s.
* **Delay** shifts it. On the **In** tab it is the pause after the clip starts before the animation begins; on the **Out** tab it is the gap between the end of the animation and the end of the clip. Leave it at 0 for the animation to touch the clip edge.
* Choose **None** to clear the preset for that tab.
The animation ends (or, for **Out**, starts) at the clip's current position, size, rotation and opacity, so place and size the clip first.
As the Inspector notes, "Applying a preset replaces existing keyframes of the properties it animates." **Fade** overwrites opacity keyframes, **Grow** overwrites scale keyframes, and so on. Keyframes on other properties are kept.
## Keyframes
A keyframe pins a property to a value at one frame; between two keyframes the value moves smoothly from one to the other. You can keyframe **opacity**, position (**X** and **Y**), rotation, scale and volume. Text and shape appearance settings such as colour, font size or stroke are not keyframeable; use Text FX or a motion graphic for those.
### Add keyframes from the Inspector
Move the playhead to the frame where the value should be fixed. Keyframe times are relative to the clip, so moving the clip keeps its keyframes in place.
Type or scrub the value in the Inspector, then click the **★** button next to the field. Keyframeable fields such as **X**, **Y** and opacity each have one.
Move the playhead to the next moment, change the value and click **★** again. Play back to check the motion.
The **★** button is a toggle: click it again while the playhead sits on a keyframe to remove that keyframe.
### Keyframe lanes on the Timeline
When a single clip with keyframes is selected, lanes appear below it on the Timeline, one per animated property, with a diamond for every keyframe.
* Drag a diamond left or right to retime it.
* Click a diamond to select it, then press `⌫` or `Delete` to remove it. With a diamond selected, the delete key acts on the keyframe, not the clip.
### The Keyframes section
For a clip that has keyframes, a **Keyframes** section at the bottom of the Inspector lists its animated properties with:
* Previous and next buttons that move the playhead from one keyframe to the next.
* **Easing** for the selected keyframe: **Linear**, **Ease in**, **Ease out** or **Ease in-out**. Easing describes how the value travels into this keyframe from the previous one.
Everything here is undoable with `⌘Z`, including preset changes and keyframe drags.
## Presets and keyframes together
A preset is stored as ordinary keyframes on the properties it drives, so you can mix the two: put **Fade** on the In tab and keyframe a slow scale across the whole clip. Just remember the warning above: re-applying or changing a preset rewrites the keyframes of its own properties.
## Ask the agent instead
The agent animates from a description and works through the same presets and keyframes:
* "Fade every title in and out over half a second."
* "Slowly push into the photo across its whole length" (a scale ramp, the classic Ken Burns move).
* "Slide the lower third in from the left, hold, then slide it out."
* "Fade the music out over the last three seconds."
See [Prompting](/editor/prompting). For designs with many moving parts, ask for a motion graphic instead; see [Motion graphics](/editor/motion-graphics).
## Continue
* [Inspector: clip properties](/editor/inspector)
* [Text and shapes](/editor/text-and-shapes)
* [Transitions](/editor/transitions)
* [Motion graphics](/editor/motion-graphics)
## Animate presets
Select a clip and find **Animate** in the Inspector. It has two tabs, **In** (how the clip appears) and **Out** (how it leaves), each with its own preset grid:
| Preset | What it does on the way in (Out plays it in reverse) |
| --------------------------- | --------------------------------------------------------------- |
| **None** | No animation |
| **Fade** | Opacity rises from transparent to the clip's opacity |
| **Grow** | Scales up into place |
| **Shrink** | Scales down into place |
| **Slide L** / **Slide R** | Moves in from the left or right while fading in |
| **Slide Up** / **Slide Dn** | Moves in from the top or bottom while fading in |
| **Spin** | Rotates into place while scaling up |
| **Twist** | Settles into place with a slight rotation and scale |
| **Gain** | Audio clips only: volume rises from silence to the clip's level |
Video, image, text and shape clips show the visual presets. Audio clips show **Gain**, which is the audio fade.
Under the grid:
* **Duration** is the length of the animation, from 0.1 to 5 s.
* **Delay** shifts it. On the **In** tab it is the pause after the clip starts before the animation begins; on the **Out** tab it is the gap between the end of the animation and the end of the clip. Leave it at 0 for the animation to touch the clip edge.
* Choose **None** to clear the preset for that tab.
The animation ends (or, for **Out**, starts) at the clip's current position, size, rotation and opacity, so place and size the clip first.
As the Inspector notes, "Applying a preset replaces existing keyframes of the properties it animates." **Fade** overwrites opacity keyframes, **Grow** overwrites scale keyframes, and so on. Keyframes on other properties are kept.
## Keyframes
A keyframe pins a property to a value at one frame; between two keyframes the value moves smoothly from one to the other. You can keyframe **opacity**, position (**X** and **Y**), rotation, scale and volume. Text and shape appearance settings such as colour, font size or stroke are not keyframeable; use Text FX or a motion graphic for those.
### Add keyframes from the Inspector
Move the playhead to the frame where the value should be fixed. Keyframe times are relative to the clip, so moving the clip keeps its keyframes in place.
Type or scrub the value in the Inspector, then click the **★** button next to the field. Keyframeable fields such as **X**, **Y** and opacity each have one.
Move the playhead to the next moment, change the value and click **★** again. Play back to check the motion.
The **★** button is a toggle: click it again while the playhead sits on a keyframe to remove that keyframe.
### Keyframe lanes on the Timeline
When a single clip with keyframes is selected, lanes appear below it on the Timeline, one per animated property, with a diamond for every keyframe.
* Drag a diamond left or right to retime it.
* Click a diamond to select it, then press `⌫` or `Delete` to remove it. With a diamond selected, the delete key acts on the keyframe, not the clip.
### The Keyframes section
For a clip that has keyframes, a **Keyframes** section at the bottom of the Inspector lists its animated properties with:
* Previous and next buttons that move the playhead from one keyframe to the next.
* **Easing** for the selected keyframe: **Linear**, **Ease in**, **Ease out** or **Ease in-out**. Easing describes how the value travels into this keyframe from the previous one.
Everything here is undoable with `⌘Z`, including preset changes and keyframe drags.
## Presets and keyframes together
A preset is stored as ordinary keyframes on the properties it drives, so you can mix the two: put **Fade** on the In tab and keyframe a slow scale across the whole clip. Just remember the warning above: re-applying or changing a preset rewrites the keyframes of its own properties.
## Ask the agent instead
The agent animates from a description and works through the same presets and keyframes:
* "Fade every title in and out over half a second."
* "Slowly push into the photo across its whole length" (a scale ramp, the classic Ken Burns move).
* "Slide the lower third in from the left, hold, then slide it out."
* "Fade the music out over the last three seconds."
See [Prompting](/editor/prompting). For designs with many moving parts, ask for a motion graphic instead; see [Motion graphics](/editor/motion-graphics).
## Continue
* [Inspector: clip properties](/editor/inspector)
* [Text and shapes](/editor/text-and-shapes)
* [Transitions](/editor/transitions)
* [Motion graphics](/editor/motion-graphics)