> ## Documentation Index
> Fetch the complete documentation index at: https://docs.goframe.dev/llms.txt
> Use this file to discover all available pages before exploring further.
# Captions
> Add styled captions built from the transcript: presets by group, fine-tune controls, the word-timing lane on the Timeline, and how captions export
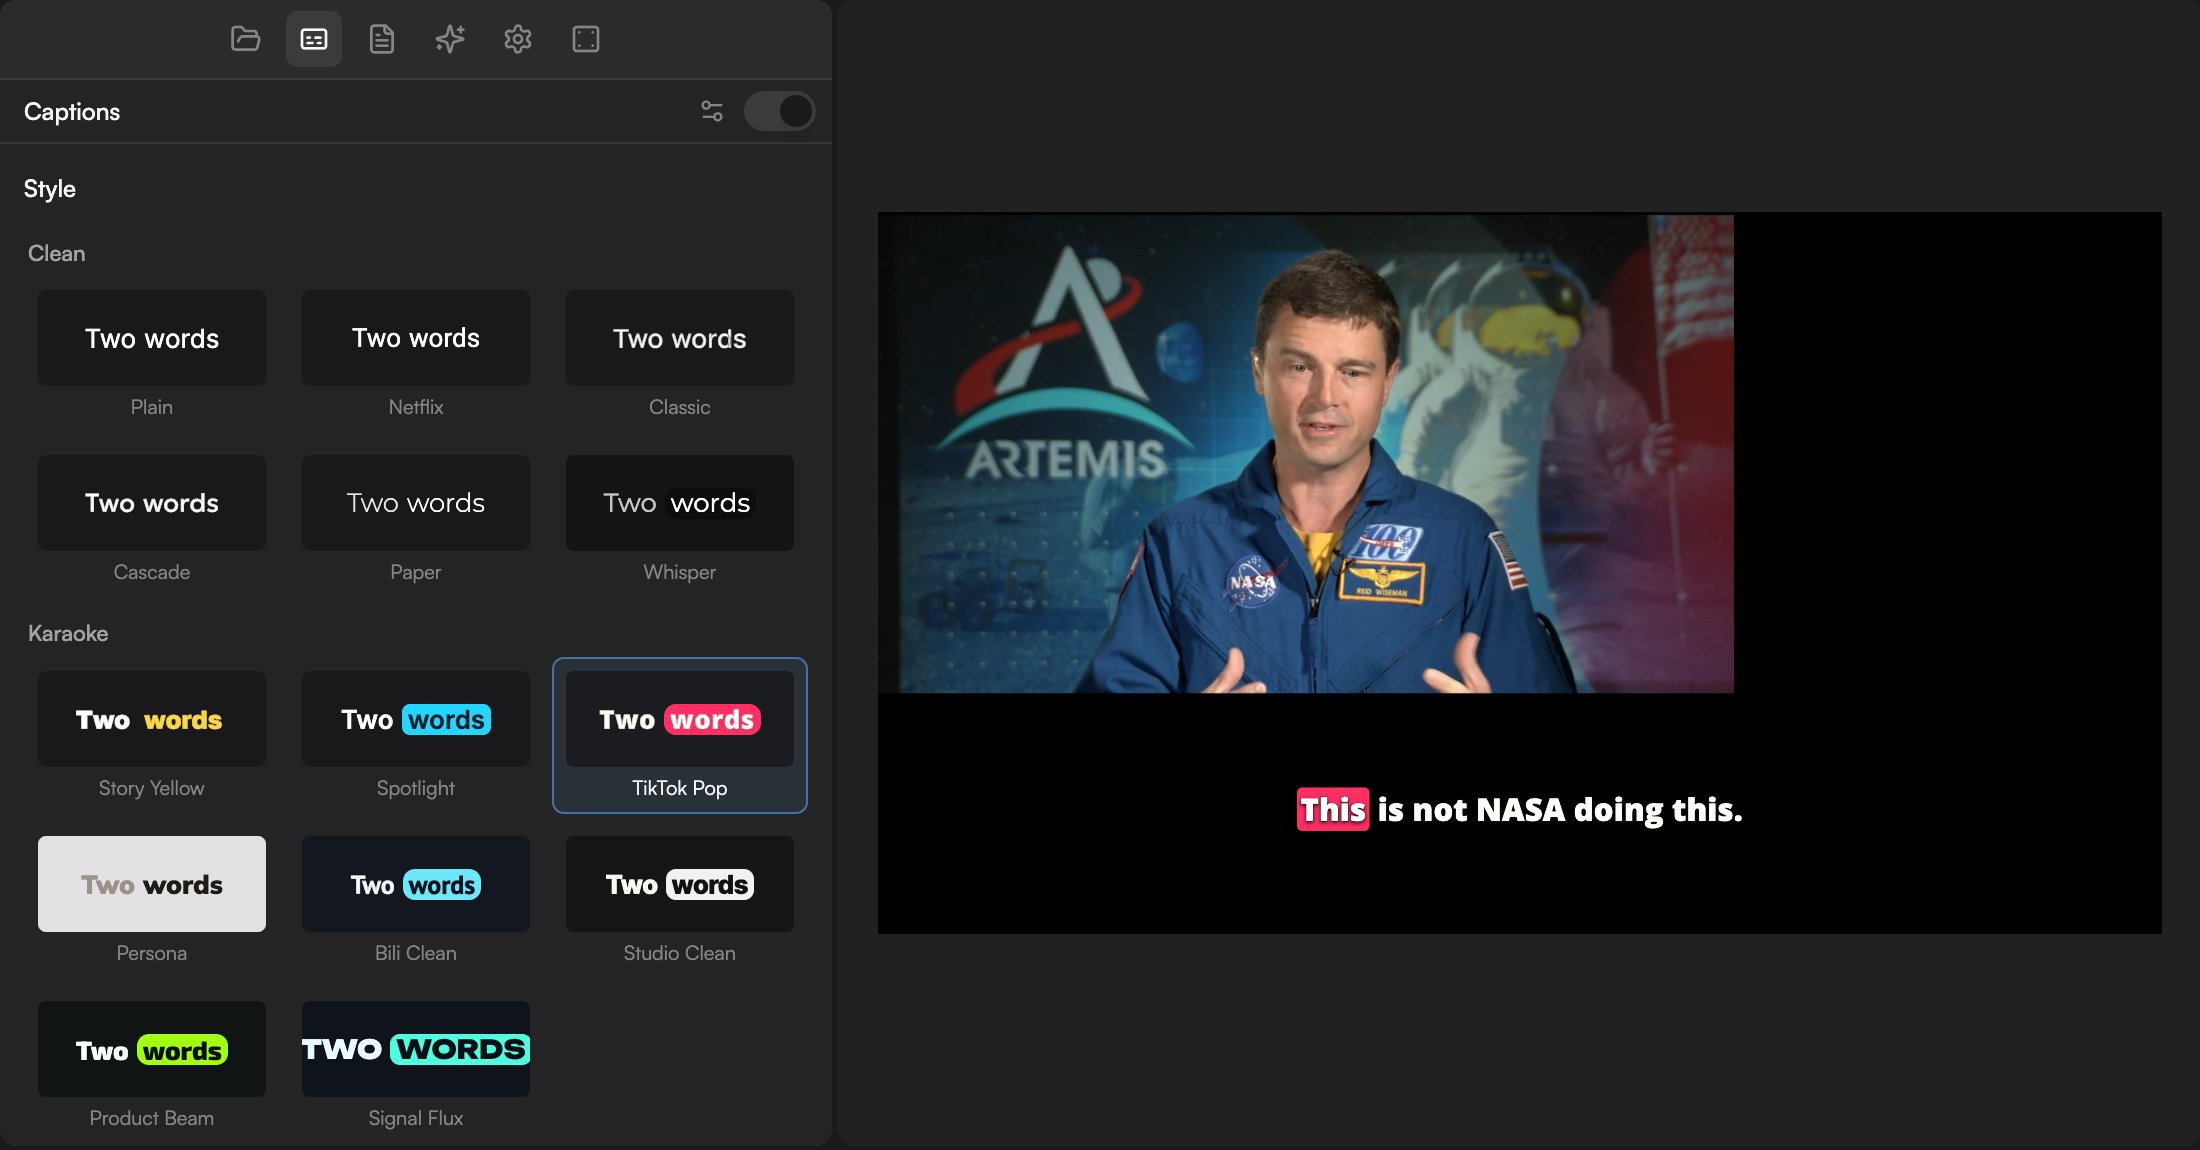
Captions are on-screen text that follows the speech in your video. In GoFrame Editor they are generated from the transcript, styled with a preset, and drawn live in Preview. You never type captions by hand: fix a word in the Transcript panel and the caption updates.
Open the **Captions** panel from the left sidebar in the **Editor** layout, or ask the agent to "Add captions".
 ## Turn captions on
Captions need at least one video or audio clip with speech on the Timeline.
If the clips have no transcript, the panel reads **Captions are built from the transcript** with a **Transcribe N files** button. Click it and wait for the transcript. See [Transcribe media](/editor/transcription) for settings and cost.
When the transcript lands, captions switch on by themselves (**Transcript ready — captions turned on**). Use the **Show captions** switch in the panel header to hide or show them. While hidden, a banner reads **Captions are hidden in the preview** with a **Turn on** button.
### Source track
In the panel's settings (the settings icon in the header), **Source track** decides which clips feed the captions. **Auto** uses every transcribed video or audio clip on the Timeline. Pick a specific track when, for example, an interview and a voiceover overlap and you only want one of them captioned.
## Presets
The **Style** section is a gallery of presets in four groups; each tile previews its look with the words "Two words".
| Group | Presets |
| ------------- | ------------------------------------------------------------------------------------------------- |
| **Clean** | Plain, Netflix, Classic, Cascade, Paper, Whisper |
| **Karaoke** | Story Yellow, Spotlight, TikTok Pop, Persona, Bili Clean, Studio Clean, Product Beam, Signal Flux |
| **Editorial** | The French Dispatch, Luxe Serif, Noir Glass, Atelier Cut |
| **Loud** | Submagic, Off the Wall, Boyz n the Hood, Bubble Pop, Pop, Dogme, Solar |
Clean presets are quiet, subtitle-style looks. Karaoke presets light up each word as it is spoken. Editorial presets lean on typography. Loud presets are the bold, social-first styles.
## Turn captions on
Captions need at least one video or audio clip with speech on the Timeline.
If the clips have no transcript, the panel reads **Captions are built from the transcript** with a **Transcribe N files** button. Click it and wait for the transcript. See [Transcribe media](/editor/transcription) for settings and cost.
When the transcript lands, captions switch on by themselves (**Transcript ready — captions turned on**). Use the **Show captions** switch in the panel header to hide or show them. While hidden, a banner reads **Captions are hidden in the preview** with a **Turn on** button.
### Source track
In the panel's settings (the settings icon in the header), **Source track** decides which clips feed the captions. **Auto** uses every transcribed video or audio clip on the Timeline. Pick a specific track when, for example, an interview and a voiceover overlap and you only want one of them captioned.
## Presets
The **Style** section is a gallery of presets in four groups; each tile previews its look with the words "Two words".
| Group | Presets |
| ------------- | ------------------------------------------------------------------------------------------------- |
| **Clean** | Plain, Netflix, Classic, Cascade, Paper, Whisper |
| **Karaoke** | Story Yellow, Spotlight, TikTok Pop, Persona, Bili Clean, Studio Clean, Product Beam, Signal Flux |
| **Editorial** | The French Dispatch, Luxe Serif, Noir Glass, Atelier Cut |
| **Loud** | Submagic, Off the Wall, Boyz n the Hood, Bubble Pop, Pop, Dogme, Solar |
Clean presets are quiet, subtitle-style looks. Karaoke presets light up each word as it is spoken. Editorial presets lean on typography. Loud presets are the bold, social-first styles.
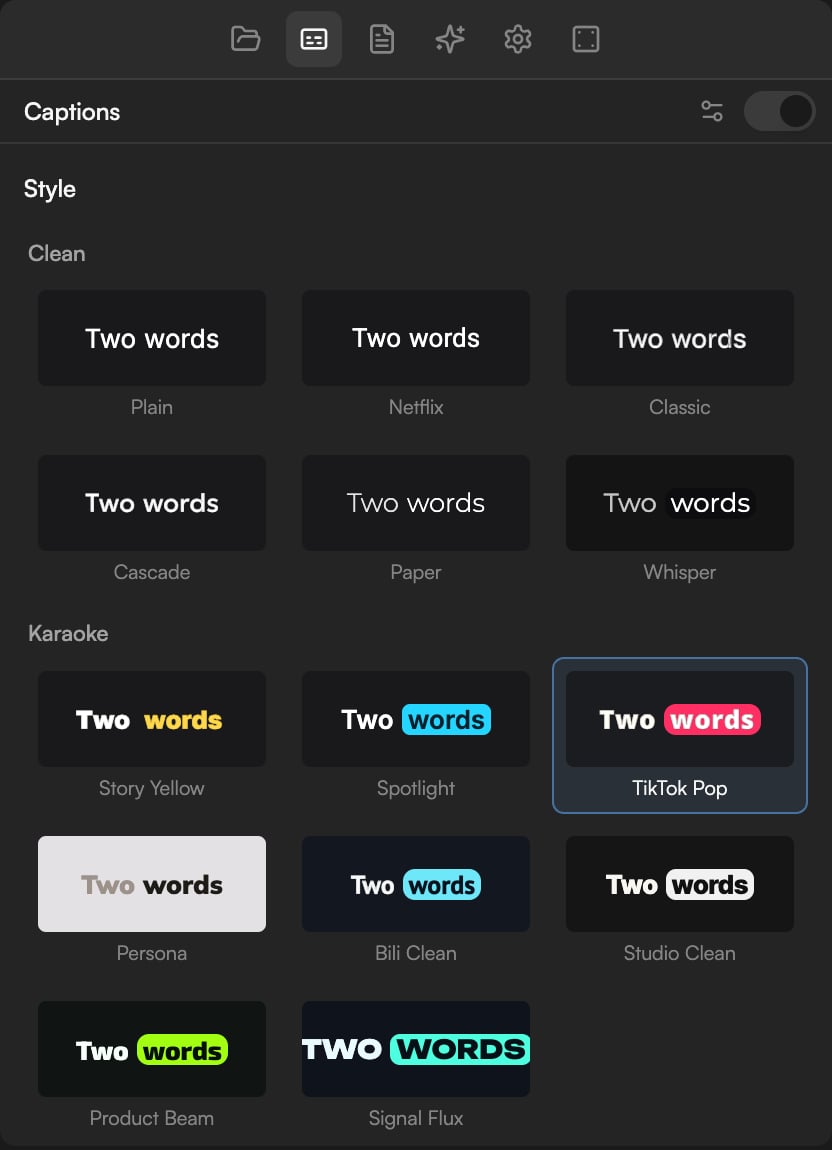 Click a preset to apply it. Right-click one for **Apply preset**, which switches to this look and drops any manual adjustments. Once you have modified a preset, the menu also offers:
* **Apply, keep my adjustments**: switch the base look but keep the font, size, position and other changes you made.
* **Reset to preset look**: discard your adjustments and return to the pure preset.
When you have changed anything, the panel shows a **Modified · N** badge counting the adjustments.
## Fine-tune
Every control below sits under the preset gallery and applies on top of the chosen preset.
### Font and size
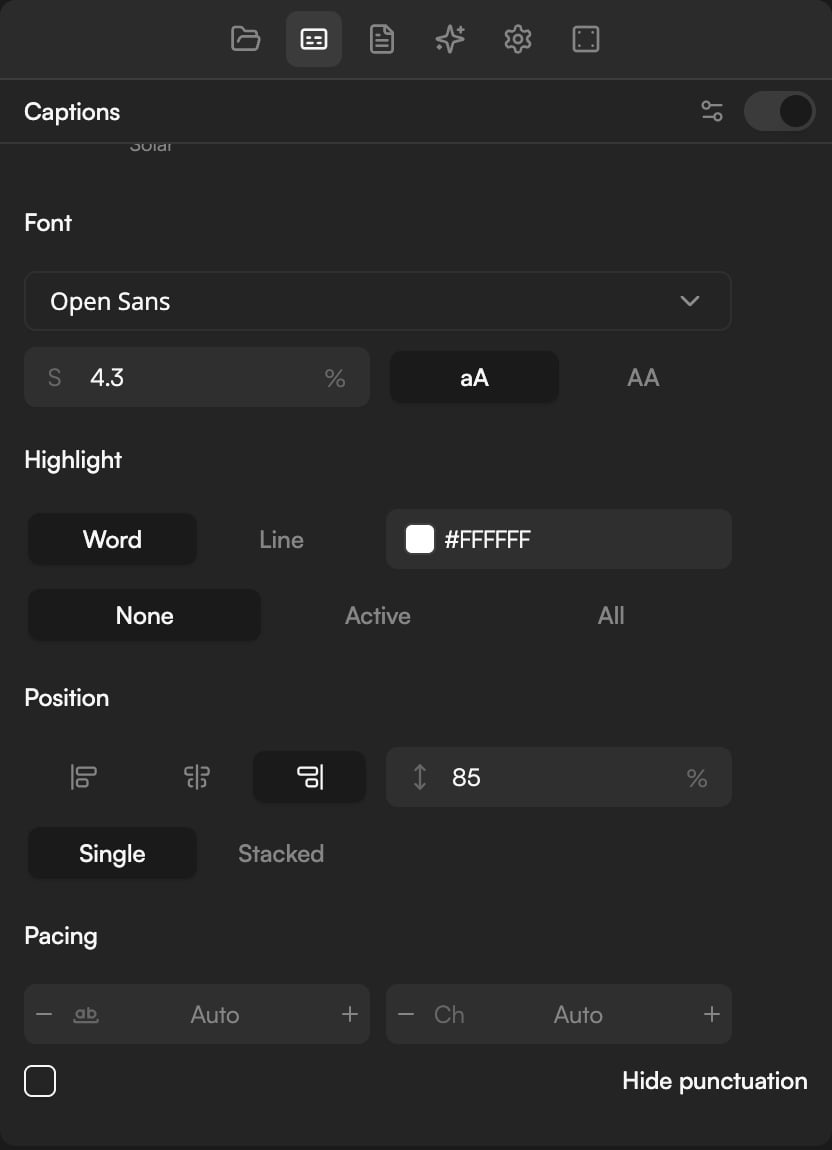
* **Font**: a dropdown of caption fonts (for example Open Sans).
* **S**: font size as a percentage of the frame (for example 4.3), so captions scale correctly when you change the project aspect ratio.
* **aA** / **AA**: keep the transcript's capitalization, or force capitals.
### Highlight
* **Word** highlights the word being spoken; **Line** highlights the whole current line.
* The colour swatch next to it (for example #FFFFFF) overrides the highlight colour, so every highlighted word uses your colour.
* Word boxes draw rounded boxes behind words: **None** turns them off; **Active** boxes only the spoken word; **All** boxes every word on the page.
### Position and layout
* **Position**: three alignment buttons (top, centre, bottom) plus a vertical offset (↕) as a percentage of the frame, for fine placement above a lower third or below a subject's face.
* **Single** shows one line at a time; **Stacked** shows the current page as multiple lines.
### Pacing
* **words**: how many words appear together. **Auto** follows the preset (fast karaoke presets show fewer words; clean presets show more); use − and + to set a number.
* **Ch**: the maximum characters per line, where a line wraps. **Auto** wraps by the available width; use − and + to set a number.
* **Hide punctuation**: drop commas, periods and similar marks from the captions without touching the transcript.
Click a preset to apply it. Right-click one for **Apply preset**, which switches to this look and drops any manual adjustments. Once you have modified a preset, the menu also offers:
* **Apply, keep my adjustments**: switch the base look but keep the font, size, position and other changes you made.
* **Reset to preset look**: discard your adjustments and return to the pure preset.
When you have changed anything, the panel shows a **Modified · N** badge counting the adjustments.
## Fine-tune
Every control below sits under the preset gallery and applies on top of the chosen preset.
### Font and size
* **Font**: a dropdown of caption fonts (for example Open Sans).
* **S**: font size as a percentage of the frame (for example 4.3), so captions scale correctly when you change the project aspect ratio.
* **aA** / **AA**: keep the transcript's capitalization, or force capitals.
### Highlight
* **Word** highlights the word being spoken; **Line** highlights the whole current line.
* The colour swatch next to it (for example #FFFFFF) overrides the highlight colour, so every highlighted word uses your colour.
* Word boxes draw rounded boxes behind words: **None** turns them off; **Active** boxes only the spoken word; **All** boxes every word on the page.
### Position and layout
* **Position**: three alignment buttons (top, centre, bottom) plus a vertical offset (↕) as a percentage of the frame, for fine placement above a lower third or below a subject's face.
* **Single** shows one line at a time; **Stacked** shows the current page as multiple lines.
### Pacing
* **words**: how many words appear together. **Auto** follows the preset (fast karaoke presets show fewer words; clean presets show more); use − and + to set a number.
* **Ch**: the maximum characters per line, where a line wraps. **Auto** wraps by the available width; use − and + to set a number.
* **Hide punctuation**: drop commas, periods and similar marks from the captions without touching the transcript.
 Vertical video for phones usually wants **AA** (uppercase), **Word** highlight, a larger size and the centre position or slightly below it. Long-form 16:9 wants a Clean preset at the bottom with **Stacked** display and more words per page.
## Edit caption text
Captions read the transcript, so text fixes happen there: open the **Transcript** panel, select the word and choose **Edit**. Deleting words in the Transcript panel cuts them from the video and the captions together, and **Hide** keeps a word in the video but out of the captions. See [Edit video by editing text](/editor/transcript-editing).
## Word timing lane
For frame-accurate control, open the caption lane on the Timeline: click the **CC** button in the Timeline toolbar. The lane appears as a row of word chips above V1, one per caption word, with page boundaries marked.
Vertical video for phones usually wants **AA** (uppercase), **Word** highlight, a larger size and the centre position or slightly below it. Long-form 16:9 wants a Clean preset at the bottom with **Stacked** display and more words per page.
## Edit caption text
Captions read the transcript, so text fixes happen there: open the **Transcript** panel, select the word and choose **Edit**. Deleting words in the Transcript panel cuts them from the video and the captions together, and **Hide** keeps a word in the video but out of the captions. See [Edit video by editing text](/editor/transcript-editing).
## Word timing lane
For frame-accurate control, open the caption lane on the Timeline: click the **CC** button in the Timeline toolbar. The lane appears as a row of word chips above V1, one per caption word, with page boundaries marked.
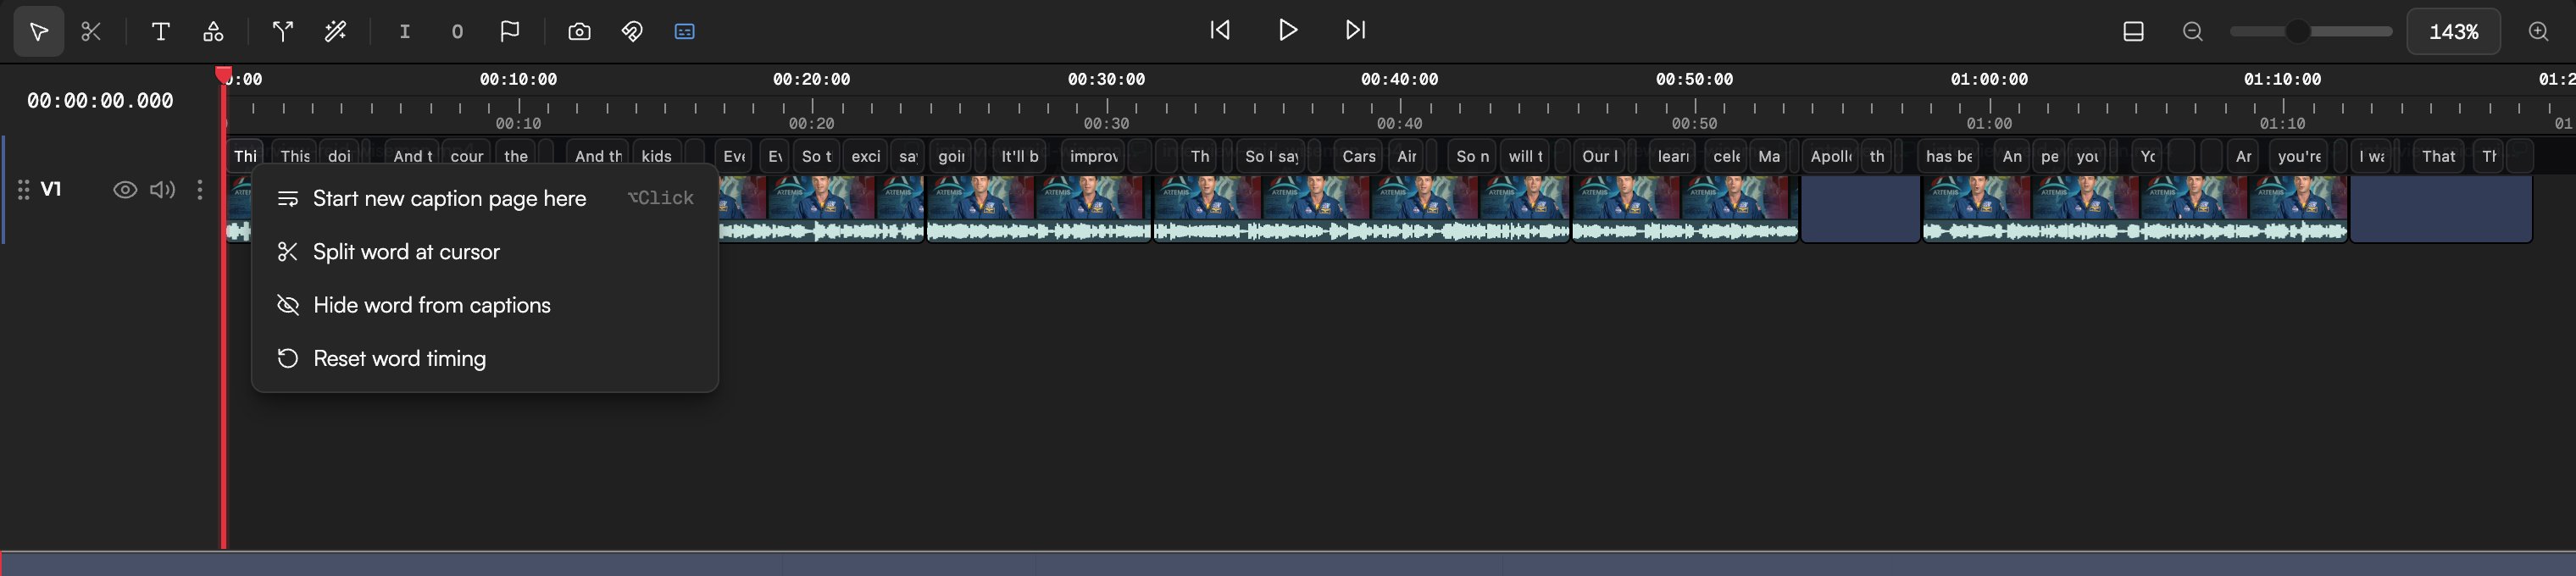
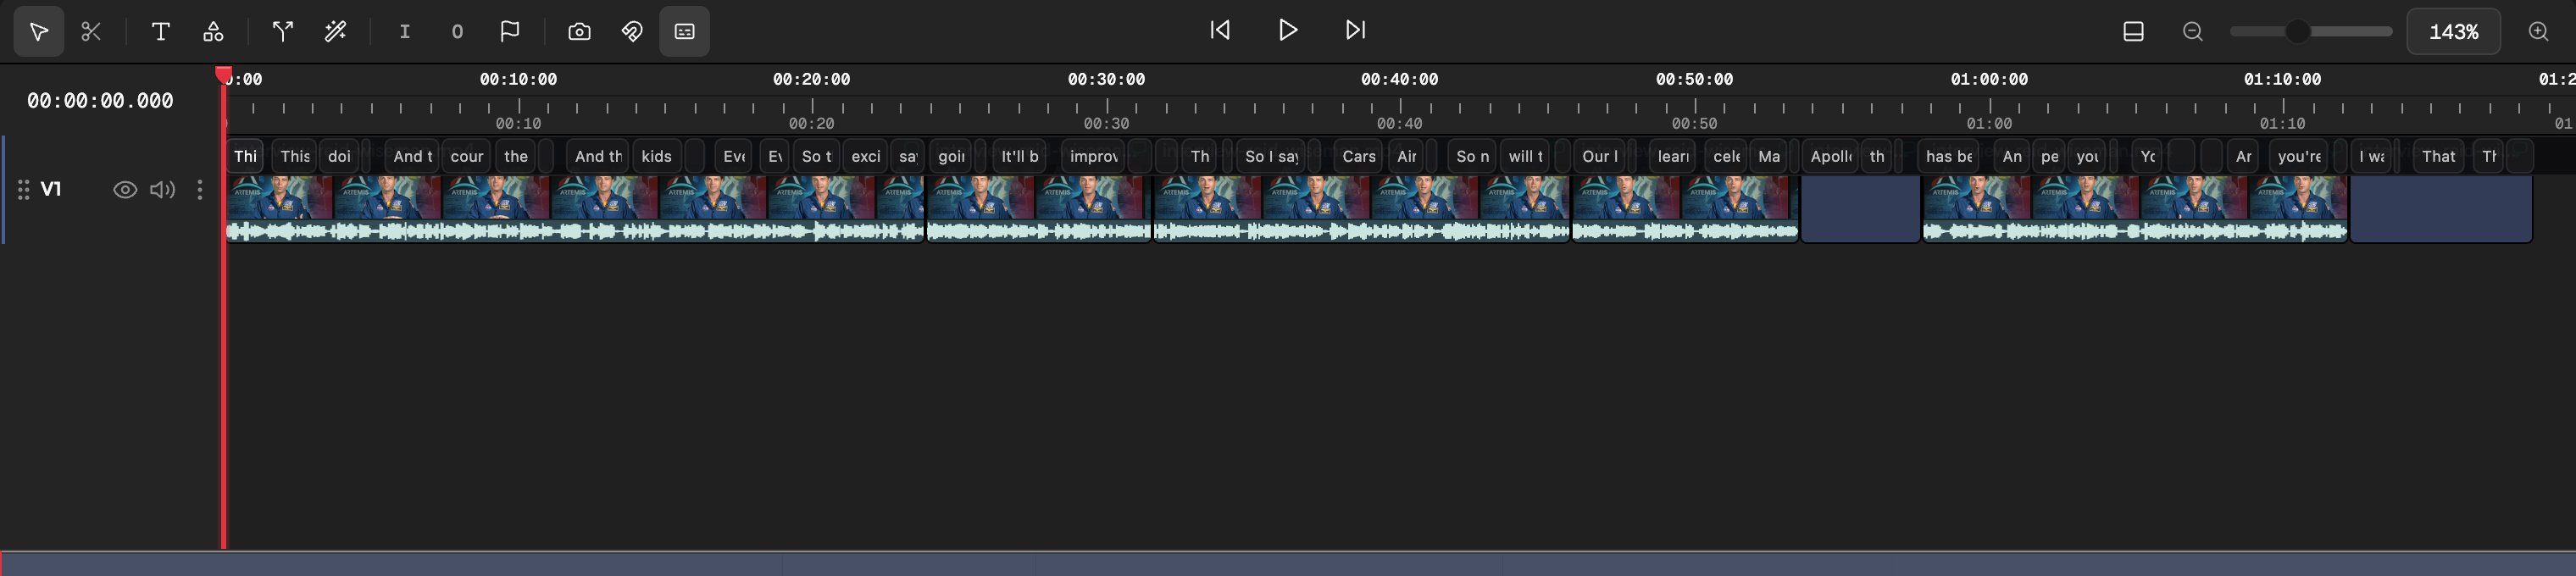 * **Retime a word**: drag a word chip, or its edges, to move where it lights up.
* **Right-click a word** for the lane menu:
| Menu item | Effect |
| --------------------------------- | ------------------------------------------------------------------------------------------------------------------------------------------------------------- |
| **Start new caption page here** | Forces a page break before this word. A marker appears in the Transcript panel too: **New caption page starts here — click to remove**. |
| **Remove page break before word** | Removes a manual page break. |
| **Split word at cursor** | Splits one word block in two so each part can be timed separately (for example a long compound word). Very short words report **Word is too short to split**. |
| **Merge word parts** | Joins split parts back into one block. |
| **Hide word from captions** | Keeps the word in the transcript and audio but leaves it out of the captions. |
| **Restore word to captions** | Brings a hidden word back. |
| **Reset word timing** | Returns the word to its transcript timing. |
| **Unhide all hidden words** | Restores every hidden word at once. |
Timing edits, hides and page breaks are stored with the project and survive preset changes. If you re-transcribe the asset, check them afterwards, as they were made on the old transcript.
## Captions on export
* **Video file** exports burn captions into the picture. The **Export Settings** dialog notes **Captions will be burned in frame by frame — this export is slower than usual.**
* **Project for editing (NLE)** exports do not render captions into the video. Turn on **Include captions (.srt)** on that tab and the package includes an `.srt` sidecar you can import into Final Cut Pro, Premiere Pro or DaVinci Resolve. See [Export for Final Cut, Premiere and Resolve](/editor/export-for-nle).
* Caption styling is not carried into NLE exports; only the words and timings are.
See [Export video](/editor/export) for formats, resolution and plan limits.
## Ask the agent
The agent can do everything in this panel and pick sensible defaults for the format:
* "Add karaoke captions in TikTok Pop, uppercase, centered."
* "Switch the captions to Netflix and move them to the bottom."
* "Make the captions bigger and show three words per page."
* "Hide punctuation in captions."
Behind the scenes this runs the `/captions` skill; see [Skills and workflows](/editor/skills). The Transcript panel's ⋯ menu also has an **Add captions** shortcut.
## Continue
* [Transcribe media](/editor/transcription)
* [Edit video by editing text](/editor/transcript-editing)
* [Export video](/editor/export)
* [Text and shapes](/editor/text-and-shapes)
* **Retime a word**: drag a word chip, or its edges, to move where it lights up.
* **Right-click a word** for the lane menu:
| Menu item | Effect |
| --------------------------------- | ------------------------------------------------------------------------------------------------------------------------------------------------------------- |
| **Start new caption page here** | Forces a page break before this word. A marker appears in the Transcript panel too: **New caption page starts here — click to remove**. |
| **Remove page break before word** | Removes a manual page break. |
| **Split word at cursor** | Splits one word block in two so each part can be timed separately (for example a long compound word). Very short words report **Word is too short to split**. |
| **Merge word parts** | Joins split parts back into one block. |
| **Hide word from captions** | Keeps the word in the transcript and audio but leaves it out of the captions. |
| **Restore word to captions** | Brings a hidden word back. |
| **Reset word timing** | Returns the word to its transcript timing. |
| **Unhide all hidden words** | Restores every hidden word at once. |
Timing edits, hides and page breaks are stored with the project and survive preset changes. If you re-transcribe the asset, check them afterwards, as they were made on the old transcript.
## Captions on export
* **Video file** exports burn captions into the picture. The **Export Settings** dialog notes **Captions will be burned in frame by frame — this export is slower than usual.**
* **Project for editing (NLE)** exports do not render captions into the video. Turn on **Include captions (.srt)** on that tab and the package includes an `.srt` sidecar you can import into Final Cut Pro, Premiere Pro or DaVinci Resolve. See [Export for Final Cut, Premiere and Resolve](/editor/export-for-nle).
* Caption styling is not carried into NLE exports; only the words and timings are.
See [Export video](/editor/export) for formats, resolution and plan limits.
## Ask the agent
The agent can do everything in this panel and pick sensible defaults for the format:
* "Add karaoke captions in TikTok Pop, uppercase, centered."
* "Switch the captions to Netflix and move them to the bottom."
* "Make the captions bigger and show three words per page."
* "Hide punctuation in captions."
Behind the scenes this runs the `/captions` skill; see [Skills and workflows](/editor/skills). The Transcript panel's ⋯ menu also has an **Add captions** shortcut.
## Continue
* [Transcribe media](/editor/transcription)
* [Edit video by editing text](/editor/transcript-editing)
* [Export video](/editor/export)
* [Text and shapes](/editor/text-and-shapes)