> ## Documentation Index
> Fetch the complete documentation index at: https://docs.goframe.dev/llms.txt
> Use this file to discover all available pages before exploring further.
# Edit clips
> Select, move, trim, split, delete, duplicate and rename clips on the Timeline, with ripple editing, snapping, status badges, undo and Remove Silences
Clips are the blocks on the Timeline: a piece of video, audio, an image, text, a shape or a motion graphic. This page covers the hands-on edits you make with the mouse and keyboard in the **Editor** layout. The agent can do all of the same things from a prompt; see [Prompting](/editor/prompting).
 ## Tools
The toolbar starts with two tools:
* **Select tool** (`V`): the default. Click, drag, trim and marquee-select.
* **Blade tool** (`B`): the pointer turns into a cutter. Click a clip to split it at that point. Press `V` to return to selecting.
You rarely need the Blade. Put the playhead where you want the cut and press `⇧B` (**Split at Playhead**): it splits every selected clip under the playhead, or the clip under the playhead if nothing is selected.
## Select
* Click a clip to select it. `⇧`-click adds more clips to the selection.
* Drag on an empty part of the Timeline to draw a marquee and select everything it touches.
* Click an empty area to clear the selection. The [Inspector](/editor/inspector) always shows the selected clip.
Clips on a locked track cannot be selected or changed; unlock the track from its right-click menu first (see [Timeline basics](/editor/timeline-basics)).
## Move
Drag a clip along its track to change when it plays, or up and down to move it to another track. A clip keeps its type rules: video, images, text and shapes go on video tracks, audio on audio tracks. Drop below the last track onto **+ New video track** or **+ New audio track** to create a track on the way.
With snapping on (`N`), the clip's edges snap to other clips, the playhead and markers as you drag.
## Trim
Drag the left or right edge of a clip to shorten or lengthen it. For video and audio you can only extend as far as the source file allows.
Hold `⇧` while you drag an edge for a **ripple trim**: every clip after it on the same track shifts to keep the cut tight, so no gap opens and no overlap appears.
## Split
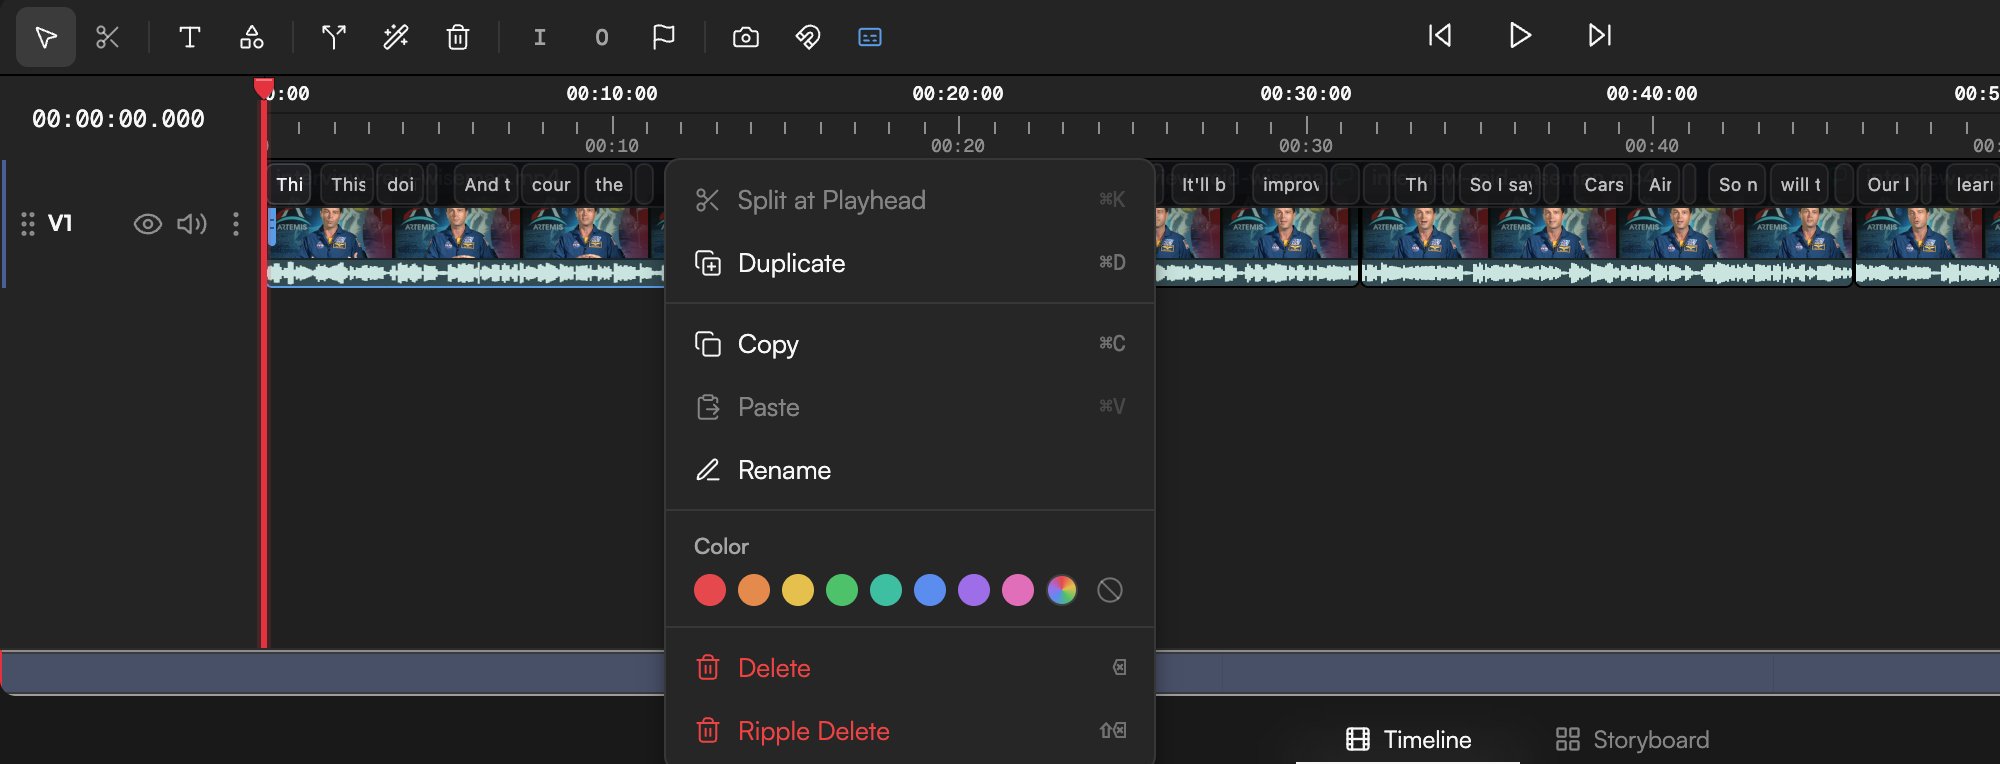
* `⇧B`, the split button in the toolbar, or **Split at Playhead** in the clip's right-click menu cuts at the playhead.
* The **Blade tool** (`B`) cuts wherever you click.
Both halves keep the same source, effects and properties. Transitions that sat on a cut that no longer exists are removed automatically.
## Delete and ripple delete
* `⌫` / `Delete`, the delete button that appears in the toolbar when something is selected, or **Delete** in the right-click menu removes the selection and leaves a gap.
* `⇧⌫` or **Ripple Delete** removes the selected clip and pulls every later clip on that track left by the same length, closing the gap.
Ripple delete works on clip selections only; transitions, masks and markers are deleted the normal way whichever keys you press.
## Duplicate, copy and paste
* `⌘D` or **Duplicate** places a copy of the selection right after the original on the same track.
* `⌘C` copies the selection; `⌘V` pastes it at the playhead on the same tracks. Right-click an empty spot and choose **Paste Here** to paste at the click position instead.
Copies keep every property, including effects, masks, animations and keyframes.
## Rename
Double-click a clip to rename it inline, or choose **Rename** from its right-click menu. Names only help you and the agent tell clips apart; they do not affect export. **Color** in the same menu tints the clip with one of eight swatches (or clears the colour) so related clips stand out on the Timeline.
## The clip menu
Right-click any clip for: **Split at Playhead** (`⇧B` in the default preset; the menu may show a different key hint), **Duplicate** (`⌘D`), **Copy** (`⌘C`), **Paste** (`⌘V`), **Rename**, **Color**, **Delete** (`⌫`) and **Ripple Delete** (`⇧⌫`). Right-clicking a transition shows a different menu; see [Transitions](/editor/transitions).
Right-click an empty area for **Add Marker**, **Paste Here**, **Add Text**, **Add Shape**, **Clear In/Out** and **Zoom to Fit**.
## Tools
The toolbar starts with two tools:
* **Select tool** (`V`): the default. Click, drag, trim and marquee-select.
* **Blade tool** (`B`): the pointer turns into a cutter. Click a clip to split it at that point. Press `V` to return to selecting.
You rarely need the Blade. Put the playhead where you want the cut and press `⇧B` (**Split at Playhead**): it splits every selected clip under the playhead, or the clip under the playhead if nothing is selected.
## Select
* Click a clip to select it. `⇧`-click adds more clips to the selection.
* Drag on an empty part of the Timeline to draw a marquee and select everything it touches.
* Click an empty area to clear the selection. The [Inspector](/editor/inspector) always shows the selected clip.
Clips on a locked track cannot be selected or changed; unlock the track from its right-click menu first (see [Timeline basics](/editor/timeline-basics)).
## Move
Drag a clip along its track to change when it plays, or up and down to move it to another track. A clip keeps its type rules: video, images, text and shapes go on video tracks, audio on audio tracks. Drop below the last track onto **+ New video track** or **+ New audio track** to create a track on the way.
With snapping on (`N`), the clip's edges snap to other clips, the playhead and markers as you drag.
## Trim
Drag the left or right edge of a clip to shorten or lengthen it. For video and audio you can only extend as far as the source file allows.
Hold `⇧` while you drag an edge for a **ripple trim**: every clip after it on the same track shifts to keep the cut tight, so no gap opens and no overlap appears.
## Split
* `⇧B`, the split button in the toolbar, or **Split at Playhead** in the clip's right-click menu cuts at the playhead.
* The **Blade tool** (`B`) cuts wherever you click.
Both halves keep the same source, effects and properties. Transitions that sat on a cut that no longer exists are removed automatically.
## Delete and ripple delete
* `⌫` / `Delete`, the delete button that appears in the toolbar when something is selected, or **Delete** in the right-click menu removes the selection and leaves a gap.
* `⇧⌫` or **Ripple Delete** removes the selected clip and pulls every later clip on that track left by the same length, closing the gap.
Ripple delete works on clip selections only; transitions, masks and markers are deleted the normal way whichever keys you press.
## Duplicate, copy and paste
* `⌘D` or **Duplicate** places a copy of the selection right after the original on the same track.
* `⌘C` copies the selection; `⌘V` pastes it at the playhead on the same tracks. Right-click an empty spot and choose **Paste Here** to paste at the click position instead.
Copies keep every property, including effects, masks, animations and keyframes.
## Rename
Double-click a clip to rename it inline, or choose **Rename** from its right-click menu. Names only help you and the agent tell clips apart; they do not affect export. **Color** in the same menu tints the clip with one of eight swatches (or clears the colour) so related clips stand out on the Timeline.
## The clip menu
Right-click any clip for: **Split at Playhead** (`⇧B` in the default preset; the menu may show a different key hint), **Duplicate** (`⌘D`), **Copy** (`⌘C`), **Paste** (`⌘V`), **Rename**, **Color**, **Delete** (`⌫`) and **Ripple Delete** (`⇧⌫`). Right-clicking a transition shows a different menu; see [Transitions](/editor/transitions).
Right-click an empty area for **Add Marker**, **Paste Here**, **Add Text**, **Add Shape**, **Clear In/Out** and **Zoom to Fit**.
 ## Status badges
A clip can show a badge while something is still happening to its media: **Uploading**, **Transcoding**, **Transcribing**, **Generating**, **AI processing** or **Error**. You can keep editing around it; the badge disappears when the job finishes. When the agent is changing the Timeline, a chip reads **AI editing N clips** over the affected clips. See [Import media](/editor/import-media) and [Transcribe media](/editor/transcription) for what each state means.
## Undo and redo
`⌘Z` undoes and `⌘⇧Z` redoes; the top bar has **Undo** and **Redo** buttons too. The history keeps 50 steps and includes agent edits, so you can step back through a change the agent made. For anything older, use [Version history](/editor/version-history) or ask the agent to `/undo`.
## Remove Silences
Select a video or audio clip that has sound, open **Smart actions** (the wand in the toolbar) and choose **Remove Silences**. GoFrame Editor cuts the quiet stretches out of the clip and tightens what is left. The action needs a clip with audio.
For more control over how aggressive the cut is, work from the [Transcript panel](/editor/transcript-editing) or ask the agent ("remove pauses longer than a second").
There is no slip or slide tool and no clip grouping yet. To move several clips together, select them all and drag.
## Other shortcut presets
The keys on this page belong to the **goframe (Default)** preset. If you switch to the Premiere Pro, DaVinci Resolve or Final Cut Pro preset in **Settings → Shortcuts**, timeline keys such as split, blade, select and snapping are remapped to that editor's habits; the right-click menu always shows the current binding next to each action. The full tables are in [Keyboard shortcuts](/editor/keyboard-shortcuts).
## Continue
* [Timeline basics](/editor/timeline-basics)
* [Inspector: clip properties](/editor/inspector)
* [Transitions](/editor/transitions)
* [Edit video by editing text](/editor/transcript-editing)
## Status badges
A clip can show a badge while something is still happening to its media: **Uploading**, **Transcoding**, **Transcribing**, **Generating**, **AI processing** or **Error**. You can keep editing around it; the badge disappears when the job finishes. When the agent is changing the Timeline, a chip reads **AI editing N clips** over the affected clips. See [Import media](/editor/import-media) and [Transcribe media](/editor/transcription) for what each state means.
## Undo and redo
`⌘Z` undoes and `⌘⇧Z` redoes; the top bar has **Undo** and **Redo** buttons too. The history keeps 50 steps and includes agent edits, so you can step back through a change the agent made. For anything older, use [Version history](/editor/version-history) or ask the agent to `/undo`.
## Remove Silences
Select a video or audio clip that has sound, open **Smart actions** (the wand in the toolbar) and choose **Remove Silences**. GoFrame Editor cuts the quiet stretches out of the clip and tightens what is left. The action needs a clip with audio.
For more control over how aggressive the cut is, work from the [Transcript panel](/editor/transcript-editing) or ask the agent ("remove pauses longer than a second").
There is no slip or slide tool and no clip grouping yet. To move several clips together, select them all and drag.
## Other shortcut presets
The keys on this page belong to the **goframe (Default)** preset. If you switch to the Premiere Pro, DaVinci Resolve or Final Cut Pro preset in **Settings → Shortcuts**, timeline keys such as split, blade, select and snapping are remapped to that editor's habits; the right-click menu always shows the current binding next to each action. The full tables are in [Keyboard shortcuts](/editor/keyboard-shortcuts).
## Continue
* [Timeline basics](/editor/timeline-basics)
* [Inspector: clip properties](/editor/inspector)
* [Transitions](/editor/transitions)
* [Edit video by editing text](/editor/transcript-editing)