> ## Documentation Index
> Fetch the complete documentation index at: https://docs.goframe.dev/llms.txt
> Use this file to discover all available pages before exploring further.
# Editor layout
> How a GoFrame Editor project is laid out: Agent and Editor layouts, the panels, the top bar, the footer, panel shortcuts and the command palette
A project in GoFrame Editor has two layouts: **Agent**, a chat-first view for directing the edit, and **Editor**, the full editor for hands-on work. This page maps every part of the screen so you know where to look.
## Two layouts
| | **Agent** layout | **Editor** layout |
| -------- | ------------------------------------------------------------------------------- | --------------------------------------------------------------------------------- |
| Best for | Describing the edit and reviewing results | Trimming, layering and fine-tuning by hand |
| Centre | Agent chat | Preview |
| Right | Dock with **Preview** and **Media** tabs, shown once the agent produces results | Agent chat |
| Left | A narrow rail: panel toggle, **+**, search, your avatar | Panel icons: Media pool, Captions, Transcript, Toolbox & VFX, Settings, Inspector |
| Bottom | Timeline hidden | Timeline |
Switch with the layout switcher in the top bar (**Agent** / **Editor**) or press `⌘.` (Ctrl on Windows). New projects open in Agent layout; each project then remembers the layout you used last. To change the default for projects you haven't opened yet, go to **Settings → General → Default layout for new projects**. See [Settings](/editor/settings).
 ## Agent layout
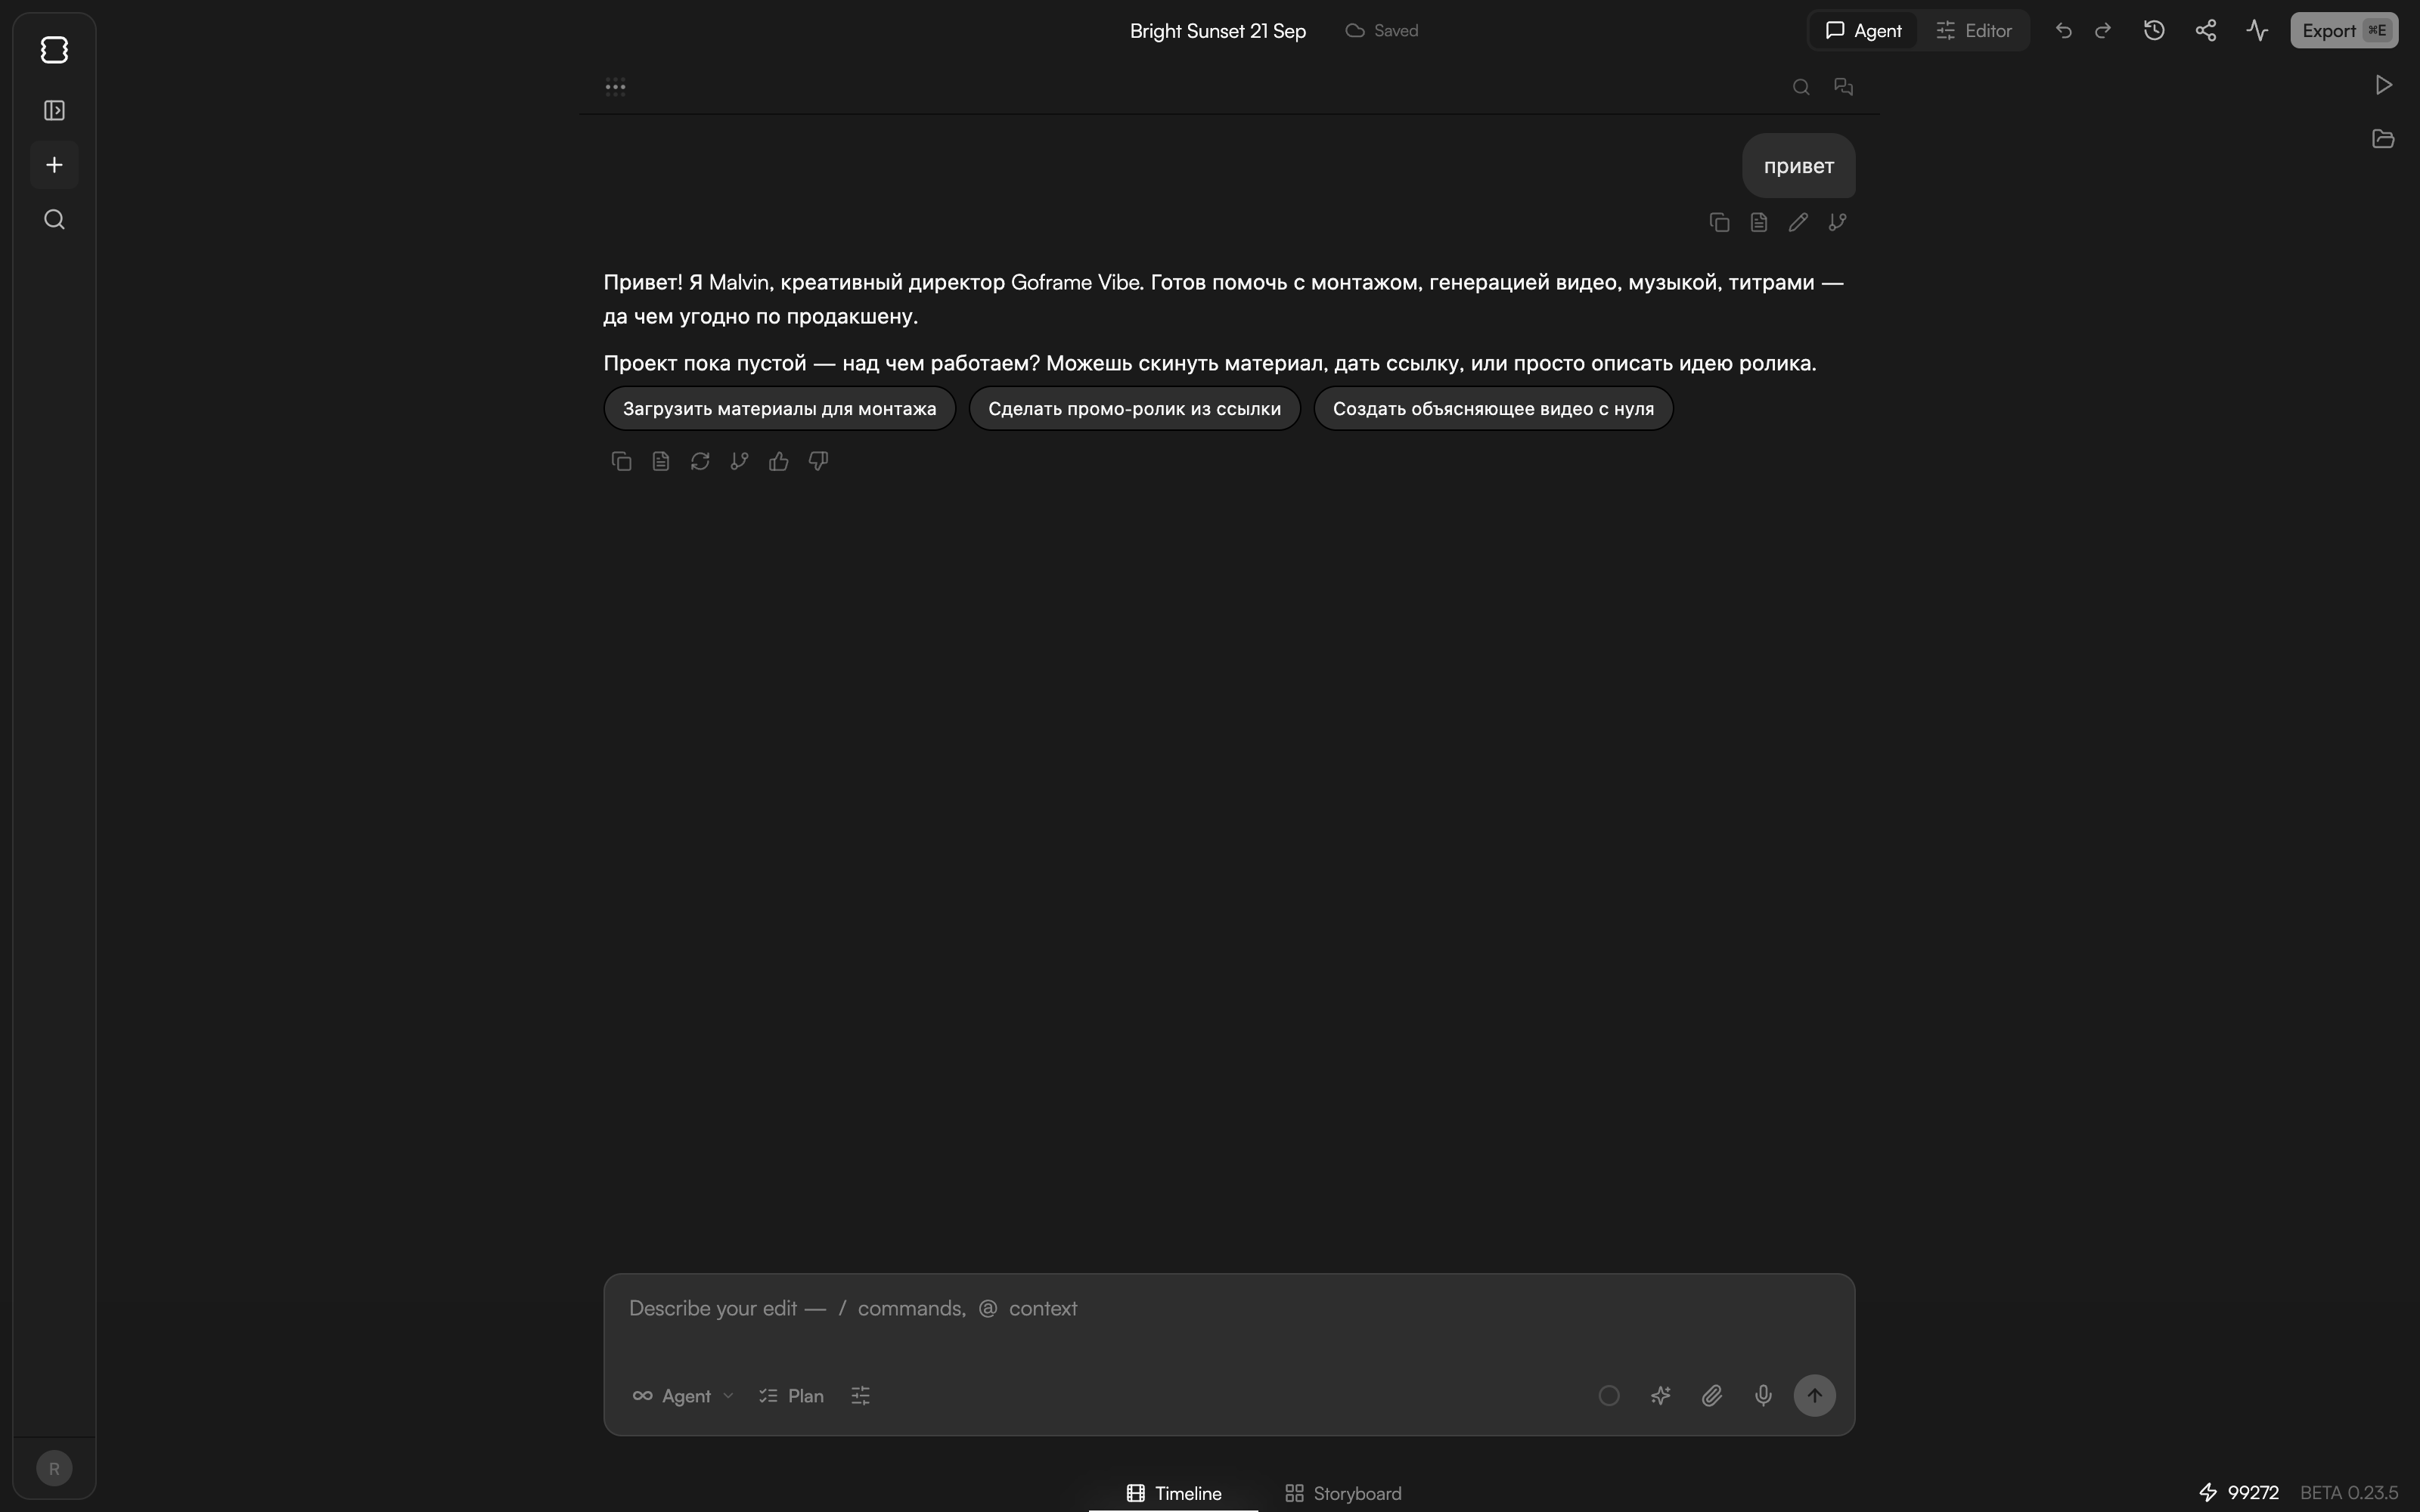
The chat fills the centre, with a search icon and the **Chats** list in its header. A narrow rail on the left holds the logo, a panel toggle, **+**, search and your avatar. The dock on the right appears when the agent produces results and has two tabs:
* **Preview**: the player. It shows the current state of the timeline as the agent works.
* **Media**: the Media pool, for importing and browsing files.
Use this layout when you are directing rather than editing: "Chat-first. Preview and media appear when the agent produces results." See [Meet GoFrame Editor Agent](/editor/agent).
## Editor layout
### Left panels
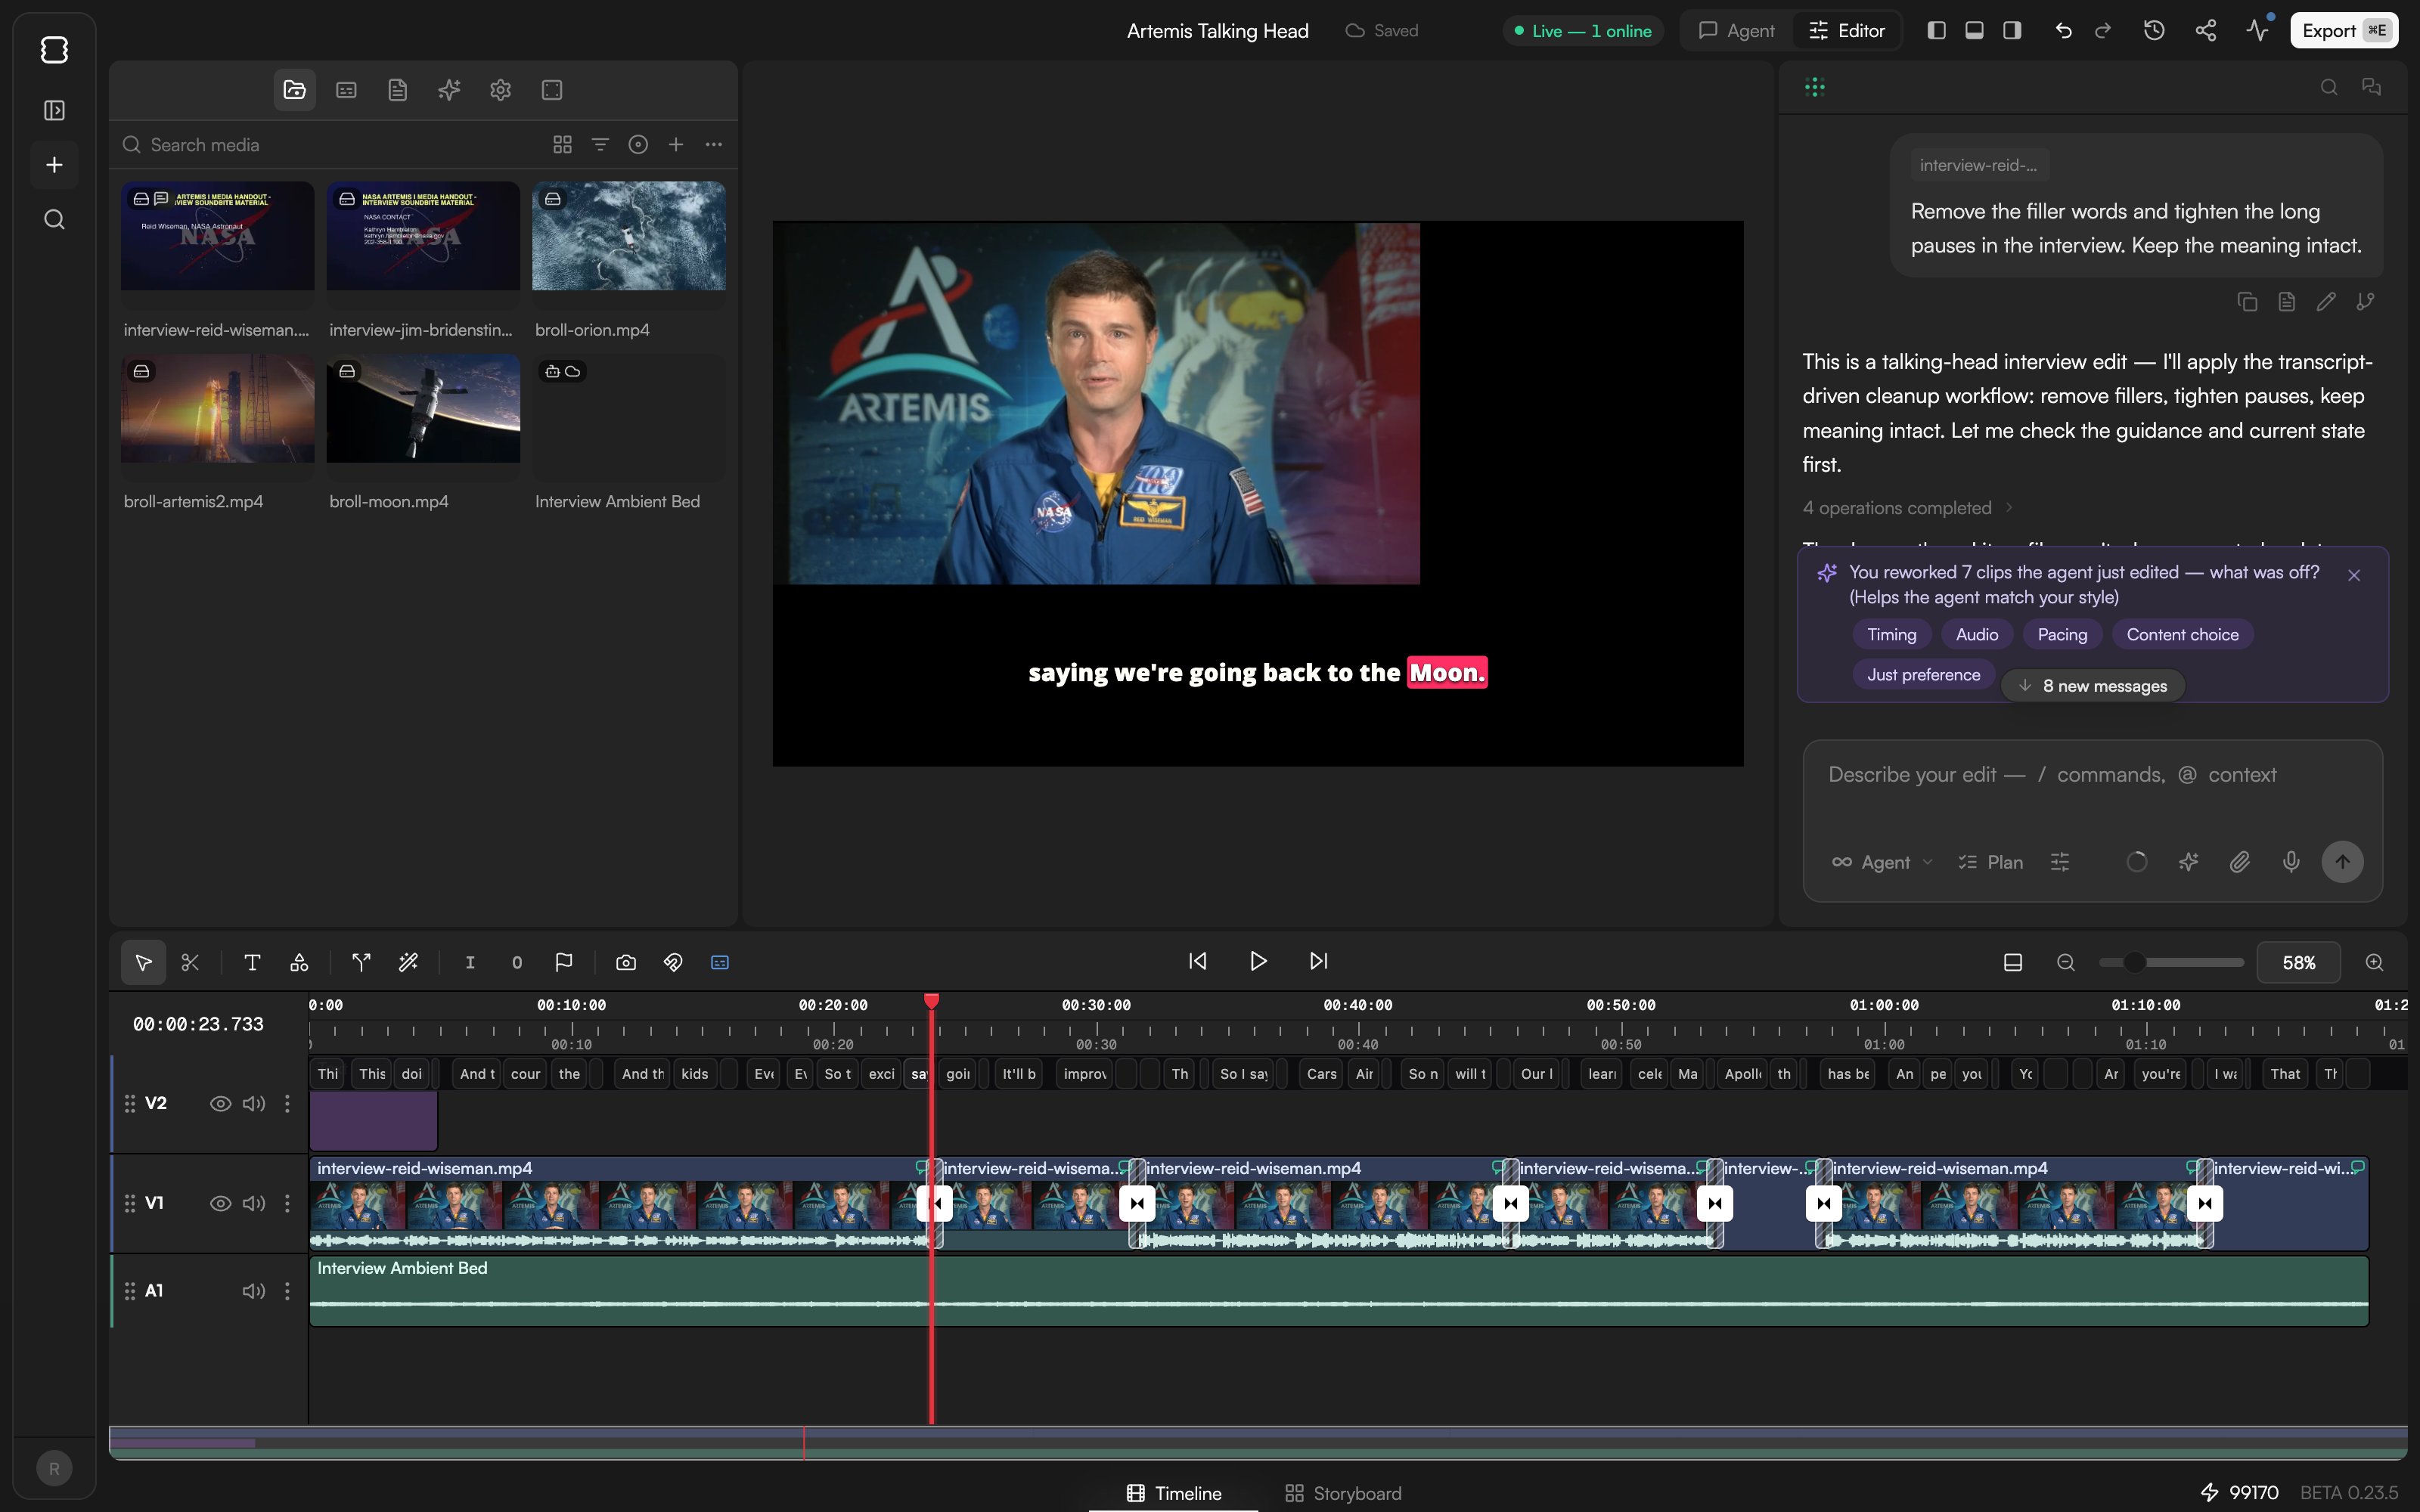
Icons down the left edge, without labels, open one panel at a time:
| Panel | What it holds |
| ----------------- | ----------------------------------------------------------------------------------------------------------------------------------------------------------------- |
| **Media pool** | Imported, recorded and generated files, with **Import**, search and folders. See [Organize the Media pool](/editor/media-pool). |
| **Captions** | Caption presets and fine-tuning. See [Captions](/editor/captions). |
| **Transcript** | The text of your footage; edit the video by editing text. See [Edit video by editing text](/editor/transcript-editing). |
| **Toolbox & VFX** | Video Transitions to drag onto cuts. See [Transitions](/editor/transitions). |
| **Settings** | Project settings: **Canvas** (aspect ratio, width, height, background colour) and **Playback** (end behaviour). See [Project settings](/editor/project-settings). |
| **Inspector** | Properties of the selected clip: position, opacity, audio, effects, animation. See [Inspector: clip properties](/editor/inspector). |
Press `⌘J` to cycle the left panel between hidden, normal and full height.
### Preview
The player in the centre shows the composition at the playhead. `Space` plays and pauses; go to start, play/pause and go to end also sit in the Timeline toolbar. Text and shape clips can be moved and resized directly on the Preview canvas, with alignment tools and an eyedropper. See [Text and shapes](/editor/text-and-shapes).
### Chat
The agent chat sits on the right. Press `⌘L` to cycle it between hidden, normal and full height.
### Timeline
The Timeline runs along the bottom, with video tracks (V1, V2, …) above audio tracks (A1, A2, …). Three panel toggles in the top bar show or hide the panels around it. When it is empty it reads "Drag media here — or ask the agent to build your edit". See [Timeline basics](/editor/timeline-basics).
The toolbar above the tracks holds, from left to right: the Select and Blade tools, **Add text**, **Add shape** (Rectangle, Ellipse, Pen, Polygon, Star, Line), split at playhead, **Smart actions** (a wand, with **Remove Silences**), delete (shown when something is selected), the In and Out point buttons, a marker flag, export frame (a camera), snapping (a magnet) and the caption lane (CC); then the transport controls; and on the right the minimap toggle and the zoom controls (−, slider, percentage, +). Undo, redo and **Version history** live in the top bar.
## Agent layout
The chat fills the centre, with a search icon and the **Chats** list in its header. A narrow rail on the left holds the logo, a panel toggle, **+**, search and your avatar. The dock on the right appears when the agent produces results and has two tabs:
* **Preview**: the player. It shows the current state of the timeline as the agent works.
* **Media**: the Media pool, for importing and browsing files.
Use this layout when you are directing rather than editing: "Chat-first. Preview and media appear when the agent produces results." See [Meet GoFrame Editor Agent](/editor/agent).
## Editor layout
### Left panels
Icons down the left edge, without labels, open one panel at a time:
| Panel | What it holds |
| ----------------- | ----------------------------------------------------------------------------------------------------------------------------------------------------------------- |
| **Media pool** | Imported, recorded and generated files, with **Import**, search and folders. See [Organize the Media pool](/editor/media-pool). |
| **Captions** | Caption presets and fine-tuning. See [Captions](/editor/captions). |
| **Transcript** | The text of your footage; edit the video by editing text. See [Edit video by editing text](/editor/transcript-editing). |
| **Toolbox & VFX** | Video Transitions to drag onto cuts. See [Transitions](/editor/transitions). |
| **Settings** | Project settings: **Canvas** (aspect ratio, width, height, background colour) and **Playback** (end behaviour). See [Project settings](/editor/project-settings). |
| **Inspector** | Properties of the selected clip: position, opacity, audio, effects, animation. See [Inspector: clip properties](/editor/inspector). |
Press `⌘J` to cycle the left panel between hidden, normal and full height.
### Preview
The player in the centre shows the composition at the playhead. `Space` plays and pauses; go to start, play/pause and go to end also sit in the Timeline toolbar. Text and shape clips can be moved and resized directly on the Preview canvas, with alignment tools and an eyedropper. See [Text and shapes](/editor/text-and-shapes).
### Chat
The agent chat sits on the right. Press `⌘L` to cycle it between hidden, normal and full height.
### Timeline
The Timeline runs along the bottom, with video tracks (V1, V2, …) above audio tracks (A1, A2, …). Three panel toggles in the top bar show or hide the panels around it. When it is empty it reads "Drag media here — or ask the agent to build your edit". See [Timeline basics](/editor/timeline-basics).
The toolbar above the tracks holds, from left to right: the Select and Blade tools, **Add text**, **Add shape** (Rectangle, Ellipse, Pen, Polygon, Star, Line), split at playhead, **Smart actions** (a wand, with **Remove Silences**), delete (shown when something is selected), the In and Out point buttons, a marker flag, export frame (a camera), snapping (a magnet) and the caption lane (CC); then the transport controls; and on the right the minimap toggle and the zoom controls (−, slider, percentage, +). Undo, redo and **Version history** live in the top bar.
 ## Top bar
From left to right:
* **Project title**: click it to rename the project inline.
* **Save status**. Projects autosave every few seconds. The label reads **Saved**, **Saving…**, **Offline — changes stored locally**, **Couldn't save — click to retry** or **Paused — project updated in another tab, reload**. See [Version history and autosave](/editor/version-history).
* **Live — N online** pill with avatars when others are in the project. See [Share and collaborate](/editor/share-and-collaborate).
* **Agent** / **Editor** switcher (tooltips **Agent (⌘.)** and **Editor (⌘.)**).
* Three panel toggles (in Editor layout) that show or hide the panels.
* **Undo** and **Redo**.
* **Version history** (a clock icon): opens the version panel.
* **Share**: opens **Share project** to invite collaborators.
* **Background tasks** (a pulse icon, with a dot while something runs) for transcription, cloud sync and MG optimization jobs. Click it to open the panel.
* **Export** (`⌘E`). See [Export video](/editor/export).
## Top bar
From left to right:
* **Project title**: click it to rename the project inline.
* **Save status**. Projects autosave every few seconds. The label reads **Saved**, **Saving…**, **Offline — changes stored locally**, **Couldn't save — click to retry** or **Paused — project updated in another tab, reload**. See [Version history and autosave](/editor/version-history).
* **Live — N online** pill with avatars when others are in the project. See [Share and collaborate](/editor/share-and-collaborate).
* **Agent** / **Editor** switcher (tooltips **Agent (⌘.)** and **Editor (⌘.)**).
* Three panel toggles (in Editor layout) that show or hide the panels.
* **Undo** and **Redo**.
* **Version history** (a clock icon): opens the version panel.
* **Share**: opens **Share project** to invite collaborators.
* **Background tasks** (a pulse icon, with a dot while something runs) for transcription, cloud sync and MG optimization jobs. Click it to open the panel.
* **Export** (`⌘E`). See [Export video](/editor/export).
 ## Footer
* **Timeline** / **Storyboard** tabs switch between the editing timeline and the Storyboard board for generation. See [Storyboard](/editor/storyboard).
* The credits counter (⚡ and your balance). Click it to open **Top up credits**. See [Plans and credits](/editor/plans-and-credits).
* **BETA** with the build version.
## Shortcuts for the layout
| Keys | Action |
| ---- | ----------------------------------------- |
| `⌘.` | Toggle Agent / Editor layout |
| `⌘J` | Left panel: hidden → normal → full height |
| `⌘L` | Chat: hidden → normal → full height |
| `⌘P` | Command palette |
| `?` | Keyboard shortcuts overlay |
| `⌘E` | Export |
Use Ctrl in place of ⌘ on Windows.
### Command palette
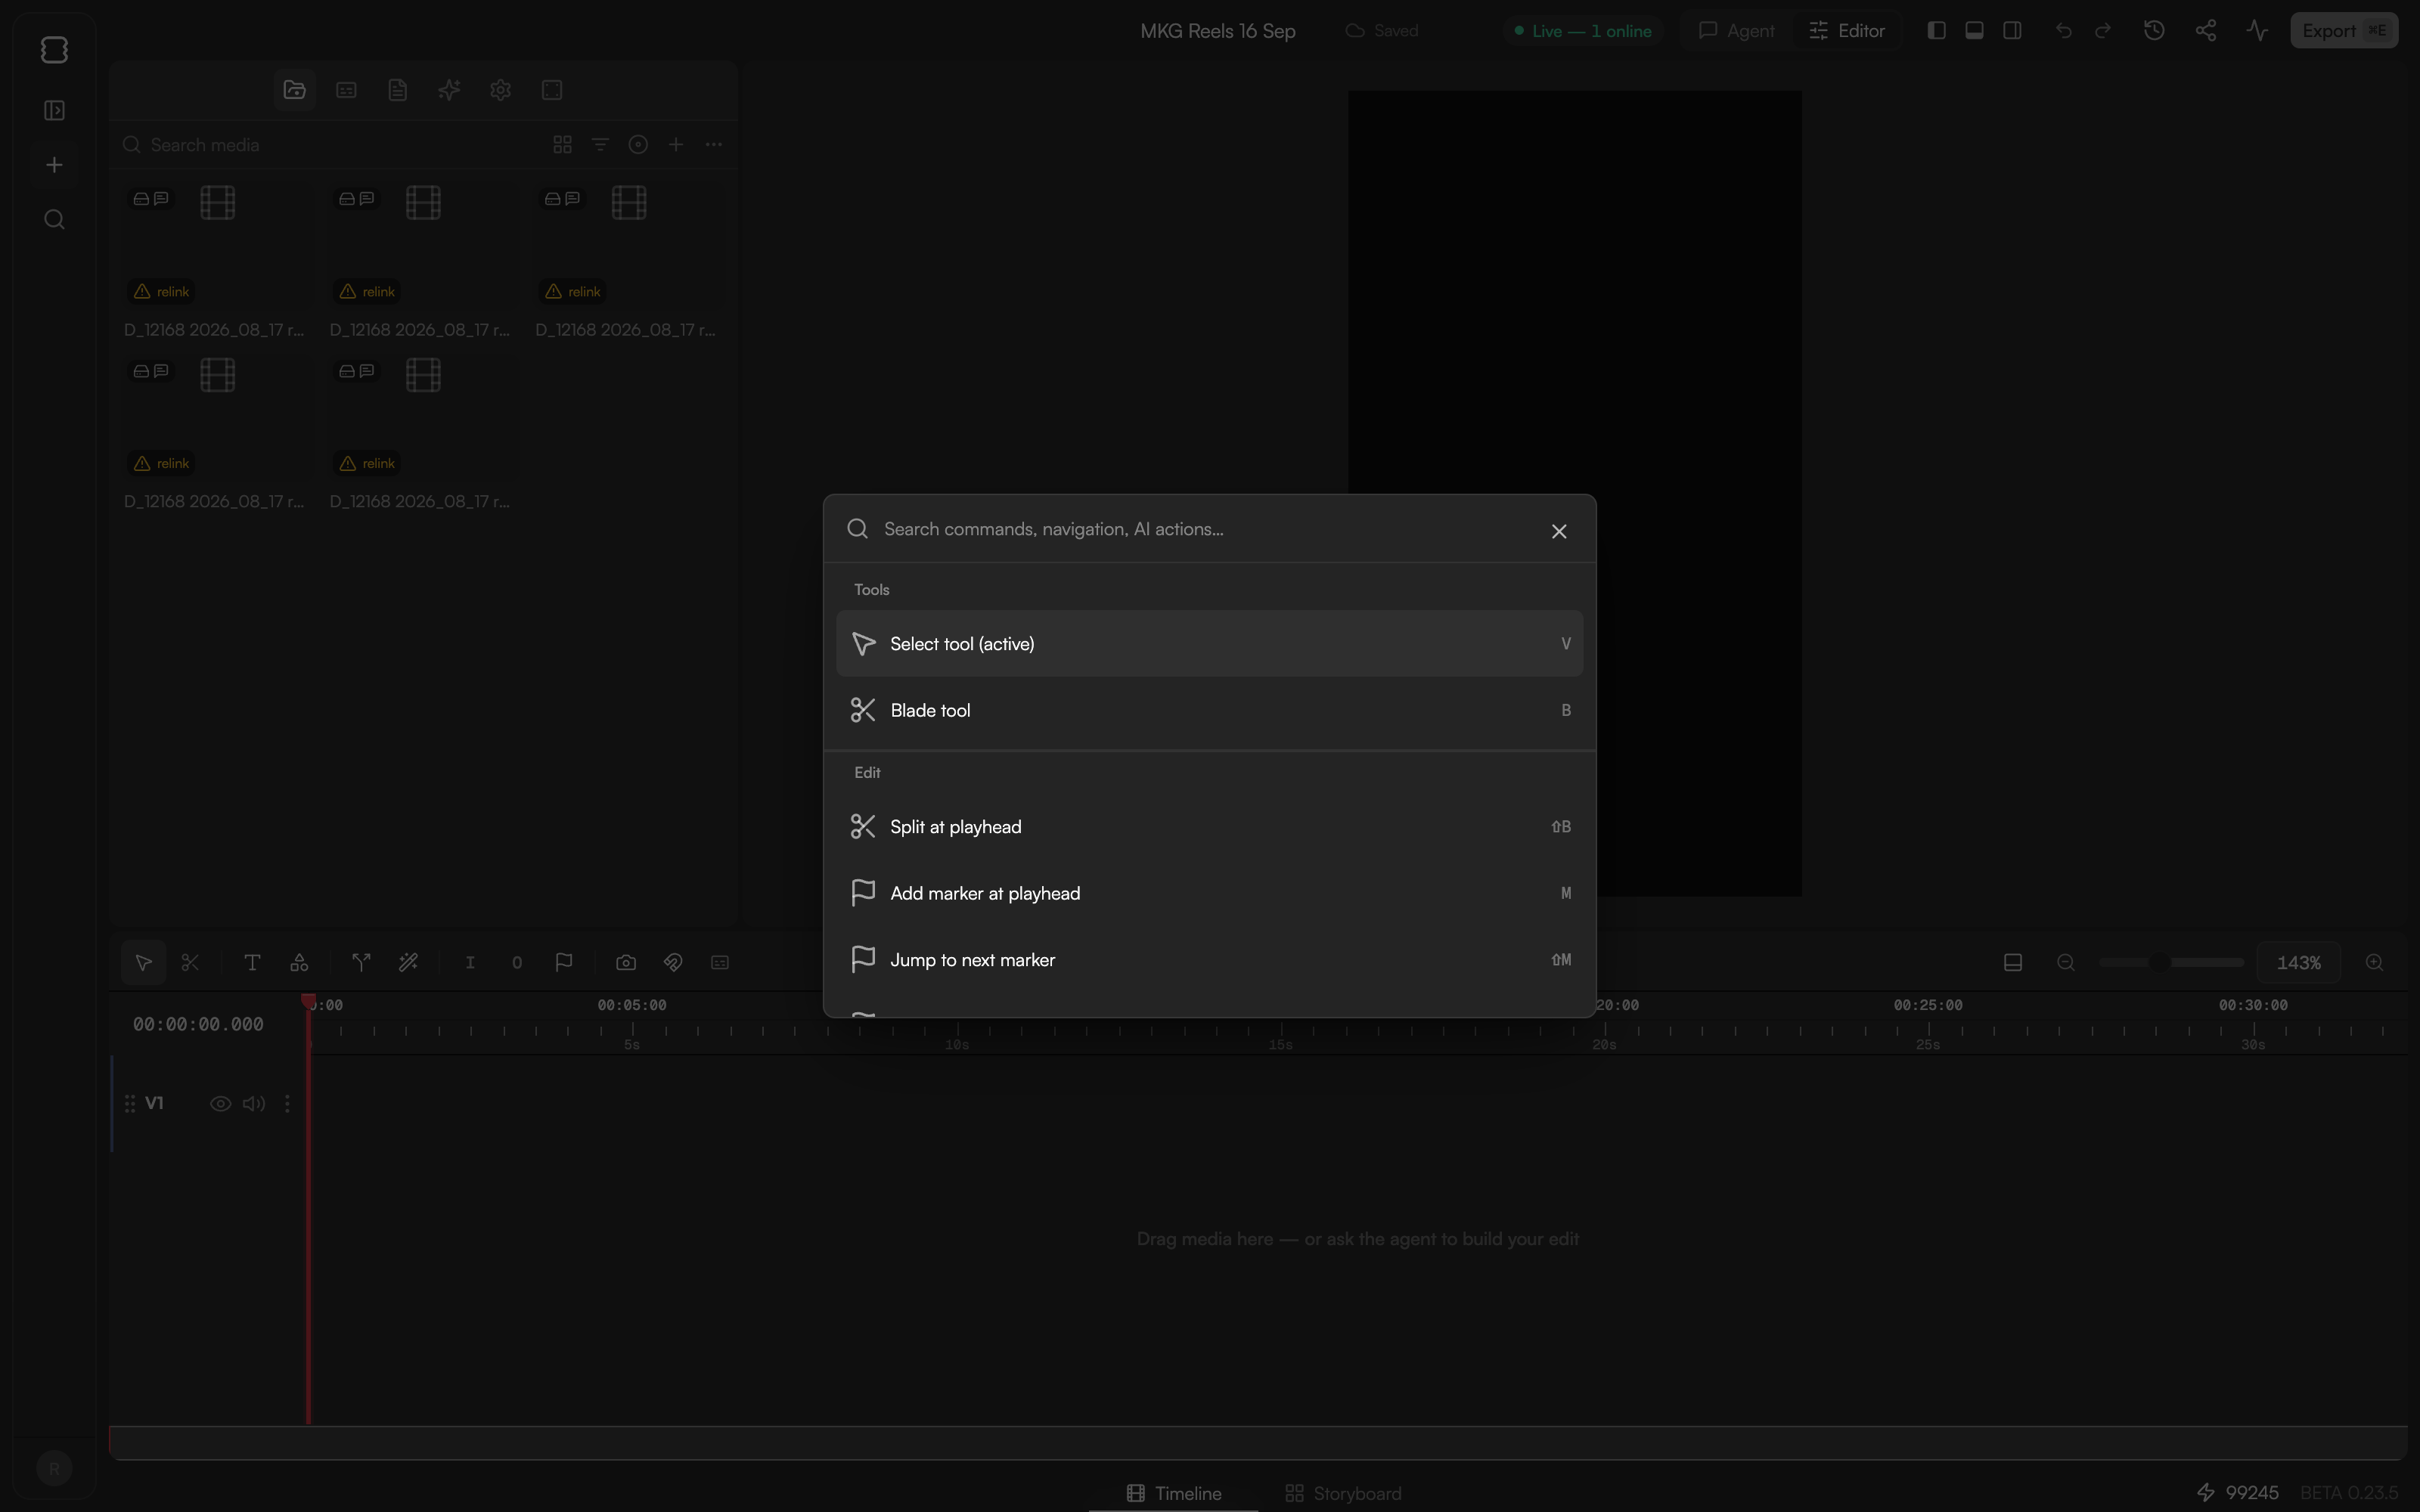
Press `⌘P` (or `⌘⇧P`) to open the command palette: a **Search** field with results grouped into **Tools**, **Edit**, **Navigation**, **View**, **Timeline**, **Tracks** and **AI**, so almost anything on the toolbar or in a menu is a few keystrokes away. Press `?` for the shortcuts overlay. See [Keyboard shortcuts](/editor/keyboard-shortcuts).
## Footer
* **Timeline** / **Storyboard** tabs switch between the editing timeline and the Storyboard board for generation. See [Storyboard](/editor/storyboard).
* The credits counter (⚡ and your balance). Click it to open **Top up credits**. See [Plans and credits](/editor/plans-and-credits).
* **BETA** with the build version.
## Shortcuts for the layout
| Keys | Action |
| ---- | ----------------------------------------- |
| `⌘.` | Toggle Agent / Editor layout |
| `⌘J` | Left panel: hidden → normal → full height |
| `⌘L` | Chat: hidden → normal → full height |
| `⌘P` | Command palette |
| `?` | Keyboard shortcuts overlay |
| `⌘E` | Export |
Use Ctrl in place of ⌘ on Windows.
### Command palette
Press `⌘P` (or `⌘⇧P`) to open the command palette: a **Search** field with results grouped into **Tools**, **Edit**, **Navigation**, **View**, **Timeline**, **Tracks** and **AI**, so almost anything on the toolbar or in a menu is a few keystrokes away. Press `?` for the shortcuts overlay. See [Keyboard shortcuts](/editor/keyboard-shortcuts).
 GoFrame Editor is designed for wide screens. In a narrow window you see the note "goframe is a widescreen experience"; widen the window or use a larger display.
## Continue
* [Timeline basics](/editor/timeline-basics) for tracks, the playhead, markers and zoom.
* [Meet GoFrame Editor Agent](/editor/agent) for the chat side of the screen.
* [Keyboard shortcuts](/editor/keyboard-shortcuts) for the full reference and presets.
* [Settings](/editor/settings) to change the default layout and theme.
GoFrame Editor is designed for wide screens. In a narrow window you see the note "goframe is a widescreen experience"; widen the window or use a larger display.
## Continue
* [Timeline basics](/editor/timeline-basics) for tracks, the playhead, markers and zoom.
* [Meet GoFrame Editor Agent](/editor/agent) for the chat side of the screen.
* [Keyboard shortcuts](/editor/keyboard-shortcuts) for the full reference and presets.
* [Settings](/editor/settings) to change the default layout and theme.