> ## Documentation Index
> Fetch the complete documentation index at: https://docs.goframe.dev/llms.txt
> Use this file to discover all available pages before exploring further.
# Organize the Media pool
> Browse, search, favorite and sort project media, read asset details, add clips to the Timeline and follow background tasks
The Media pool is the project's library: everything you import, record or generate lives here. Use it to find assets fast, inspect their details, and put them on the Timeline.
In the **Editor** layout the Media pool is a panel in the left sidebar. In the **Agent** layout it is the **Media** tab of the right dock, next to **Preview**. See [Editor layout](/editor/editor-layout).
 ## Browse and filter
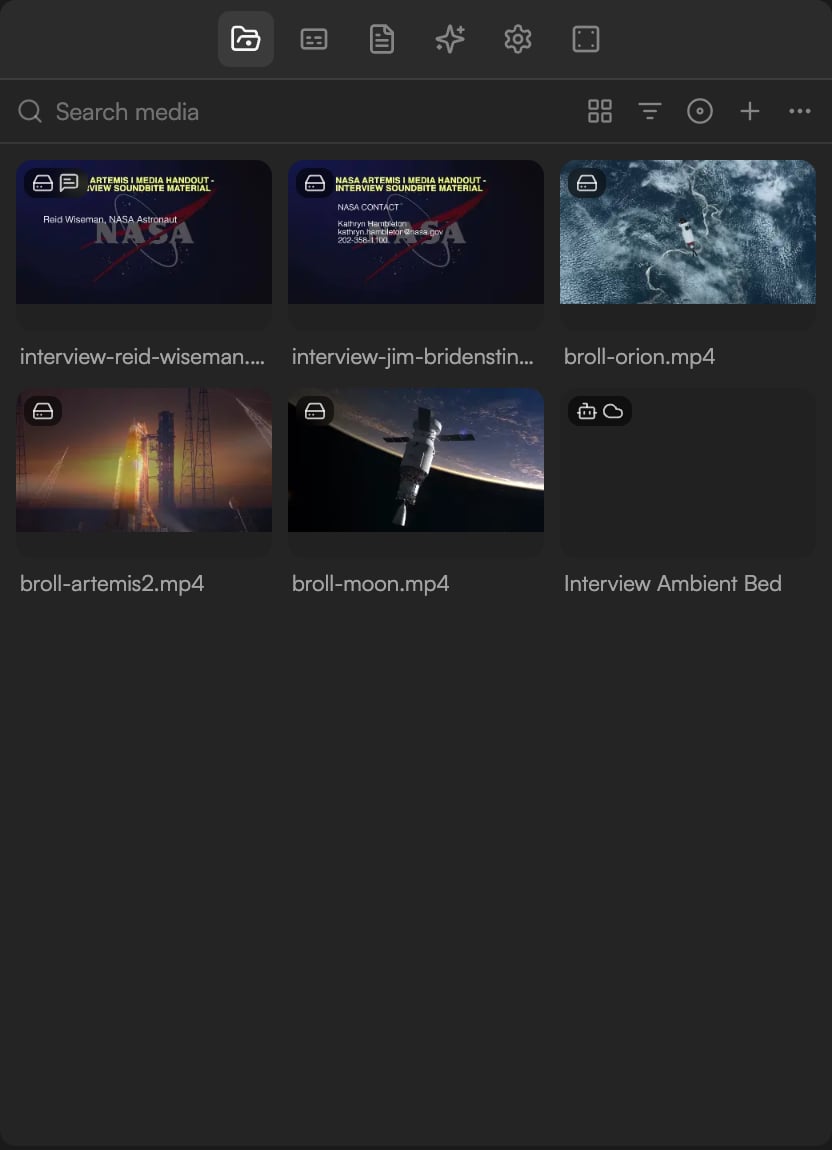
The panel header holds **Search media** and a row of buttons: **Switch view**, **Filter by type or favorites**, **Record screen, camera, or voice**, **Import files** and **Library settings** (⋯).
* **Search media**: type to filter by name.
* **Switch view** (its tooltip names the current view, for example **View: Grid**) changes how assets are laid out.
* **Filter by type or favorites** narrows the list to video, audio, images or motion graphics, or to starred assets. Star an asset with **Star** in its right-click menu.
### Folders
Create folders to group assets: choose **New folder…**, name it, and move assets into it with **Move to folder** from the asset's right-click menu. The top level is called **Library**.
## Add media to the Timeline
* **Drag** an asset onto a track. Drop between tracks on the **+ New video track** target to create a track for it.
* **Add to timeline**: from the asset's right-click menu, append the clip to the Timeline.
* **Insert at playhead**: from the same menu, place the clip at the current playhead position.
Video and audio you add to the Timeline can be transcribed for text editing and captions. See [Transcribe media](/editor/transcription).
You can also reference an asset in chat: type `@` and pick it. The agent then uses that asset when it builds or edits the Timeline. See [Write prompts, references and commands](/editor/prompting).
## Asset details
Select an asset to see its details: dimensions, frame rate, duration, file size, format, when it was imported and its upload status (Uploaded, Uploading…, Pending upload, Local only or Upload error).
### AI-generated assets
Assets created by the agent carry a **Created by AI agent** badge and record the **Model**, the **Variant** number and the prompt used. Copy the prompt from here to iterate on a generation, or click **Reveal in library** on the job card in the chat to jump to the asset.
## Browse and filter
The panel header holds **Search media** and a row of buttons: **Switch view**, **Filter by type or favorites**, **Record screen, camera, or voice**, **Import files** and **Library settings** (⋯).
* **Search media**: type to filter by name.
* **Switch view** (its tooltip names the current view, for example **View: Grid**) changes how assets are laid out.
* **Filter by type or favorites** narrows the list to video, audio, images or motion graphics, or to starred assets. Star an asset with **Star** in its right-click menu.
### Folders
Create folders to group assets: choose **New folder…**, name it, and move assets into it with **Move to folder** from the asset's right-click menu. The top level is called **Library**.
## Add media to the Timeline
* **Drag** an asset onto a track. Drop between tracks on the **+ New video track** target to create a track for it.
* **Add to timeline**: from the asset's right-click menu, append the clip to the Timeline.
* **Insert at playhead**: from the same menu, place the clip at the current playhead position.
Video and audio you add to the Timeline can be transcribed for text editing and captions. See [Transcribe media](/editor/transcription).
You can also reference an asset in chat: type `@` and pick it. The agent then uses that asset when it builds or edits the Timeline. See [Write prompts, references and commands](/editor/prompting).
## Asset details
Select an asset to see its details: dimensions, frame rate, duration, file size, format, when it was imported and its upload status (Uploaded, Uploading…, Pending upload, Local only or Upload error).
### AI-generated assets
Assets created by the agent carry a **Created by AI agent** badge and record the **Model**, the **Variant** number and the prompt used. Copy the prompt from here to iterate on a generation, or click **Reveal in library** on the job card in the chat to jump to the asset.
 ### Actions
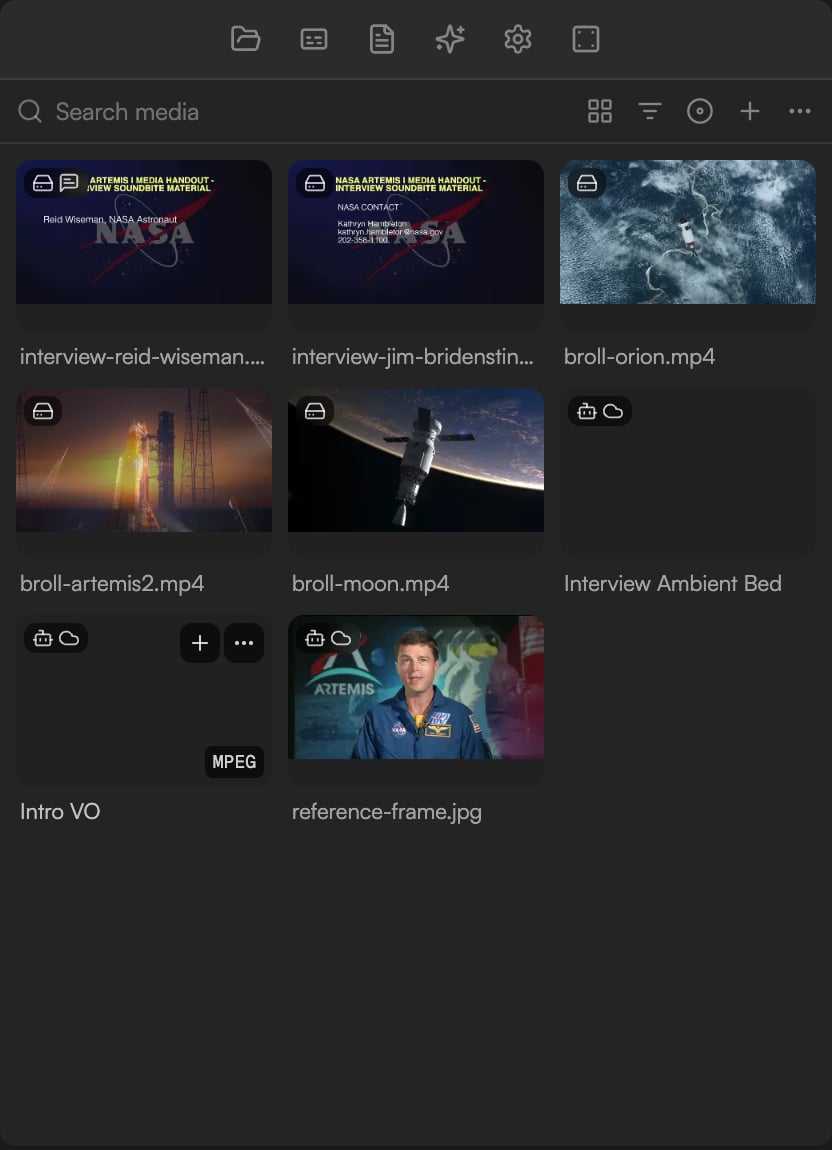
Right-click an asset for **Add to timeline**, **Insert at playhead**, **Download**, **Move to folder**, **Cloud Sync**, **Relink…**, **Star** and **Remove**.
* **Cloud Sync**: upload the file or keep it local. See [Import media](/editor/import-media).
* **Download**: save the original file.
* **Relink…**: point a missing local file at its new location.
* **Remove**: remove the asset from the project.
To transcribe video or audio, use the **Transcript** panel; see [Transcribe media](/editor/transcription).
**Remove** asks **Delete "name"?** — "The media will be removed from the project library. This cannot be undone." Clips on the Timeline that use the asset are removed as well.
## Library settings
Two switches live under **Library settings** (the ⋯ button in the panel header):
* **Auto cloud sync** — *Upload new files automatically*. Every new import is synced without a per-asset toggle.
* **MG optimization** — *Bake motion graphics to video in background*. Motion graphics are pre-rendered so exports start faster. When it is off, GoFrame Editor turns it on for you at export time and waits for the bake to finish. See [Motion graphics](/editor/motion-graphics).
## Background tasks
Transcription, cloud sync and MG optimization run without blocking you. The **Background tasks** button in the top bar (a pulse icon; a dot appears while something is running) opens the **Background tasks** panel.
### Actions
Right-click an asset for **Add to timeline**, **Insert at playhead**, **Download**, **Move to folder**, **Cloud Sync**, **Relink…**, **Star** and **Remove**.
* **Cloud Sync**: upload the file or keep it local. See [Import media](/editor/import-media).
* **Download**: save the original file.
* **Relink…**: point a missing local file at its new location.
* **Remove**: remove the asset from the project.
To transcribe video or audio, use the **Transcript** panel; see [Transcribe media](/editor/transcription).
**Remove** asks **Delete "name"?** — "The media will be removed from the project library. This cannot be undone." Clips on the Timeline that use the asset are removed as well.
## Library settings
Two switches live under **Library settings** (the ⋯ button in the panel header):
* **Auto cloud sync** — *Upload new files automatically*. Every new import is synced without a per-asset toggle.
* **MG optimization** — *Bake motion graphics to video in background*. Motion graphics are pre-rendered so exports start faster. When it is off, GoFrame Editor turns it on for you at export time and waits for the bake to finish. See [Motion graphics](/editor/motion-graphics).
## Background tasks
Transcription, cloud sync and MG optimization run without blocking you. The **Background tasks** button in the top bar (a pulse icon; a dot appears while something is running) opens the **Background tasks** panel.
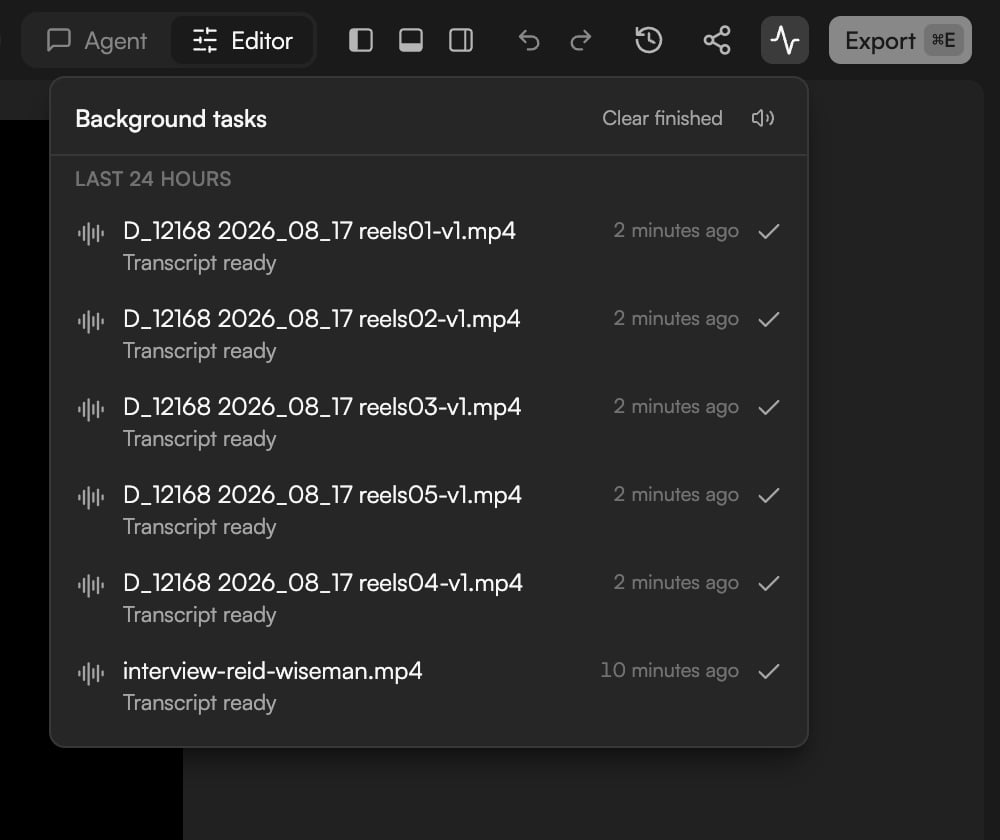 * Running tasks are listed with their current stage, for example the transcription stages described in [Transcribe media](/editor/transcription).
* **Last 24 hours** keeps finished tasks for a day, one row per file ("interview\.mp4 · 5 minutes ago · Transcript ready"). Click **Clear finished** to tidy up.
* Failed tasks stay listed with their error so you can start them again from the asset.
A page reload interrupts tasks that run in the browser, such as uploads. Start them again from the asset.
## Continue
* [Import media](/editor/import-media)
* [Record screen, camera and voice](/editor/record)
* [Transcribe media](/editor/transcription)
* [Timeline basics](/editor/timeline-basics)
* Running tasks are listed with their current stage, for example the transcription stages described in [Transcribe media](/editor/transcription).
* **Last 24 hours** keeps finished tasks for a day, one row per file ("interview\.mp4 · 5 minutes ago · Transcript ready"). Click **Clear finished** to tidy up.
* Failed tasks stay listed with their error so you can start them again from the asset.
A page reload interrupts tasks that run in the browser, such as uploads. Start them again from the asset.
## Continue
* [Import media](/editor/import-media)
* [Record screen, camera and voice](/editor/record)
* [Transcribe media](/editor/transcription)
* [Timeline basics](/editor/timeline-basics)