> ## Documentation Index
> Fetch the complete documentation index at: https://docs.goframe.dev/llms.txt
> Use this file to discover all available pages before exploring further.
# Storyboard
> Plan and generate shots on an infinite board: Scene frames, image and video nodes, a prompt bar with variants, node actions, and assembly to the timeline
The Storyboard is a second view of your project: an infinite board where you generate and arrange images, clips, audio and notes before they go on the timeline. Use it to explore looks side by side and build a shot list scene by scene. The chat agent remains the primary way to generate; the board is where you compare options visually, and the agent can build and edit it for you.
## Open the Storyboard
Click **Storyboard** in the footer, next to **Timeline**. The board and the timeline share the same project and Media pool. Click **Timeline** to switch back.
 ## What's on the board
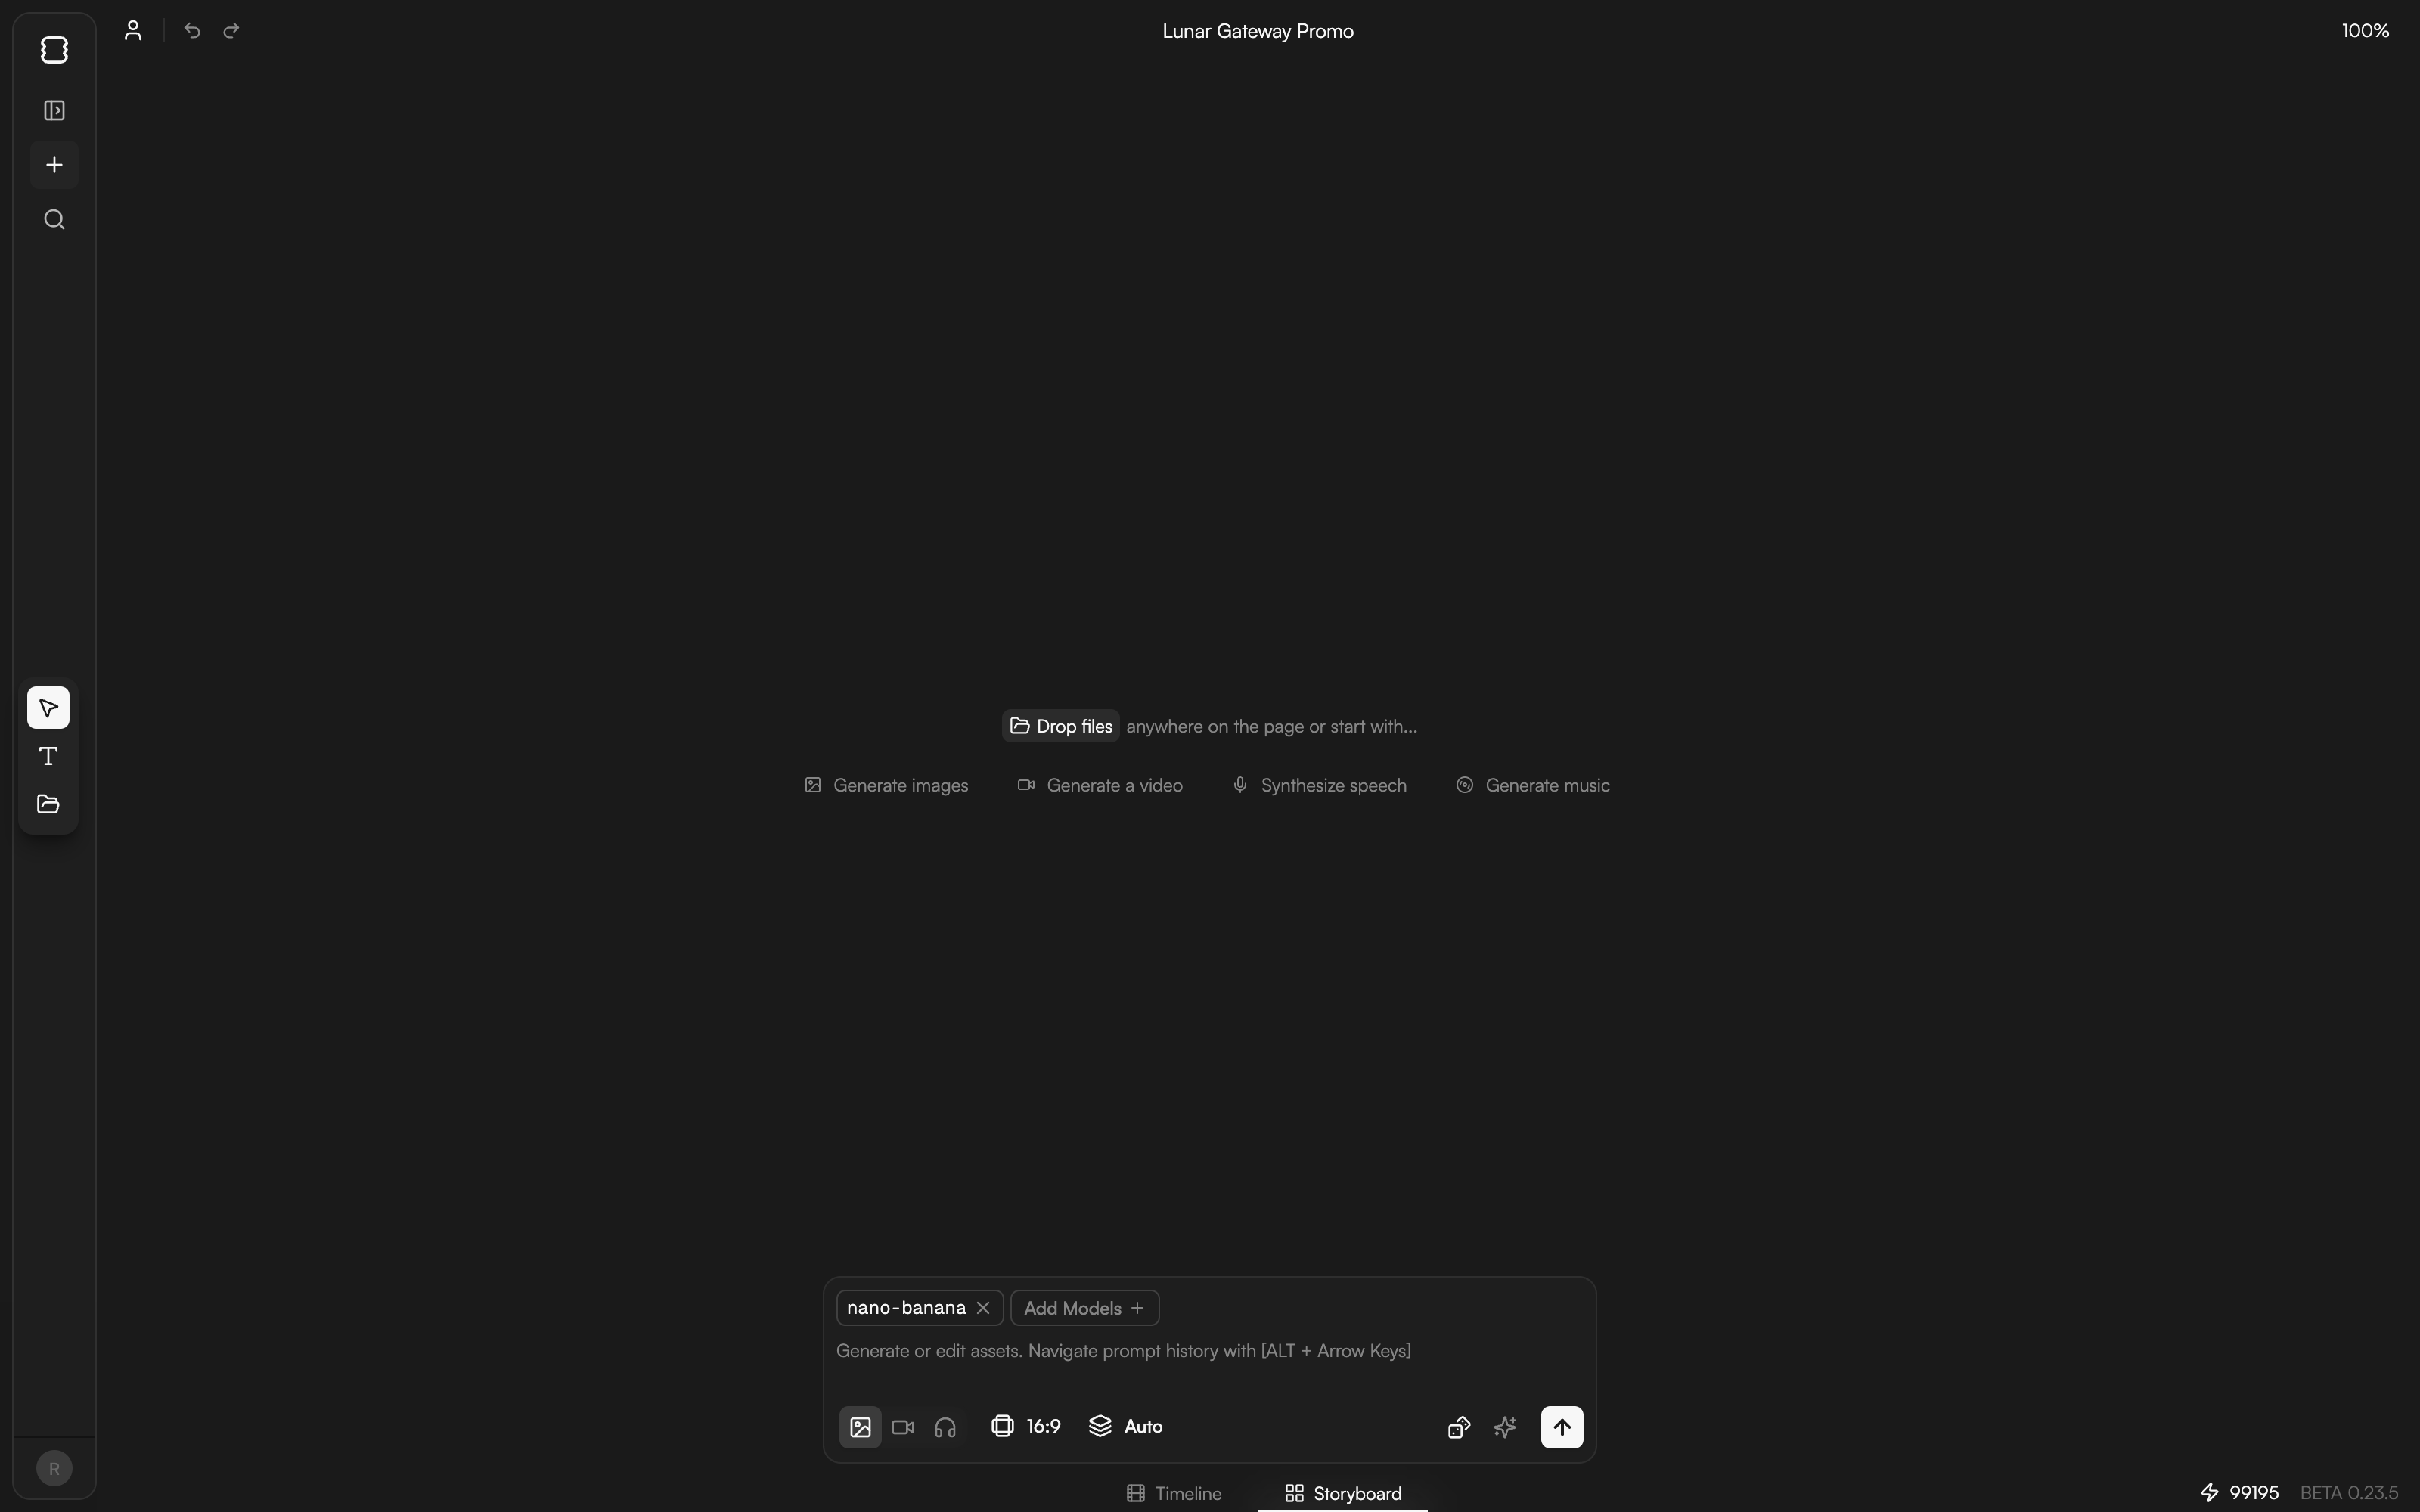
* **Nodes.** Images, videos, audio and text notes, each shown as a card on the board.
* **Scene frames.** Frames that group nodes into one shot, so a storyboard reads left to right as a sequence. Ask the agent to lay them out for you.
* **Tool rail.** On the left: **Select** to pan and select, **Text** to add a note, **Media pool** to open your assets. Drop files anywhere on the page to add them.
* **Top bar.** Undo and redo, the project title and the current zoom level (**100%** to start).
An empty board reads "Drop files anywhere on the page or start with…" and offers **Generate images**, **Generate a video**, **Synthesize speech** and **Generate music**.
## Generate from the prompt bar
The prompt bar at the bottom of the board generates straight onto the canvas.
## What's on the board
* **Nodes.** Images, videos, audio and text notes, each shown as a card on the board.
* **Scene frames.** Frames that group nodes into one shot, so a storyboard reads left to right as a sequence. Ask the agent to lay them out for you.
* **Tool rail.** On the left: **Select** to pan and select, **Text** to add a note, **Media pool** to open your assets. Drop files anywhere on the page to add them.
* **Top bar.** Undo and redo, the project title and the current zoom level (**100%** to start).
An empty board reads "Drop files anywhere on the page or start with…" and offers **Generate images**, **Generate a video**, **Synthesize speech** and **Generate music**.
## Generate from the prompt bar
The prompt bar at the bottom of the board generates straight onto the canvas.
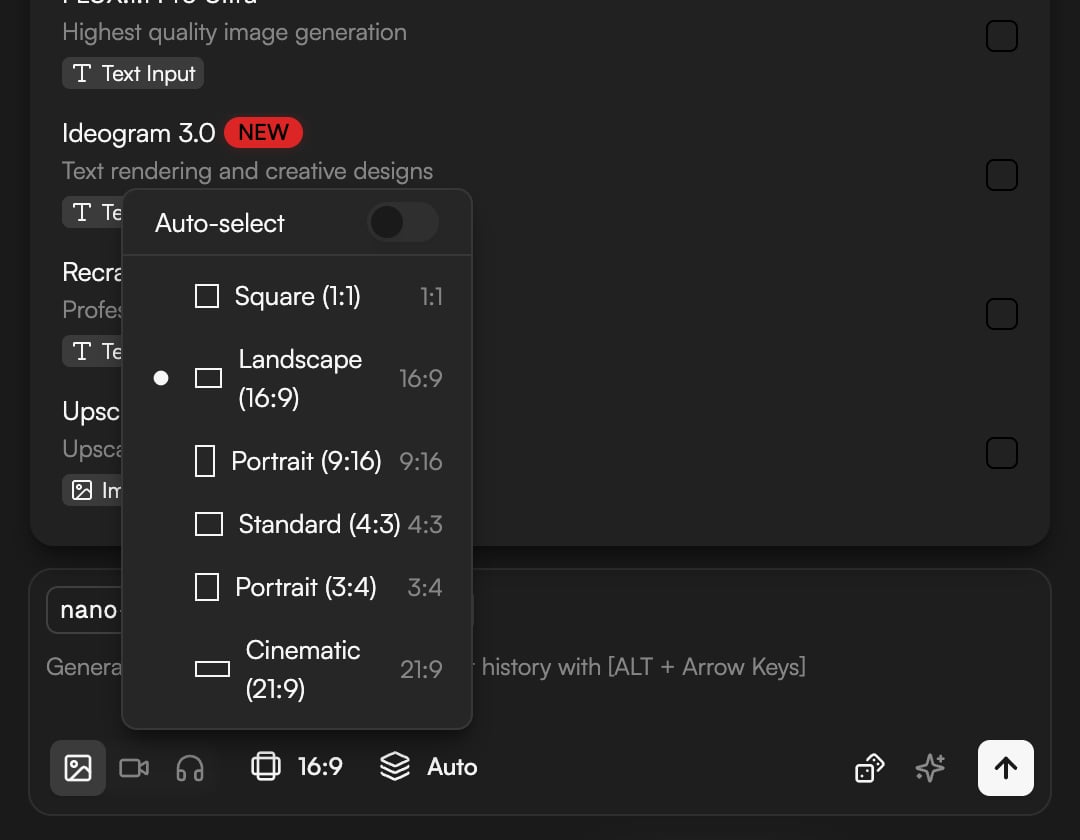 Type into the prompt bar (placeholder: "Generate or edit assets. Navigate prompt history with \[ALT + Arrow Keys]"). Use `⌥` (Alt) + arrow keys to step through your prompt history. Click the enhance-prompt button to expand a short idea into a fuller prompt.
The model chip shows the current model; click **Add Models** to pick another. Use the type icons to choose image, video or audio, the aspect menu (**Auto-select**, **Square (1:1)**, **Landscape (16:9)**, **Portrait (9:16)**, **Standard (4:3)**, **Portrait (3:4)**, **Cinematic (21:9)**), and the variants selector, which reads **Auto** unless you set a number.
Click send. New nodes appear with a **Generating…** status and fill in when ready. The bar also edits assets: select a node and describe the change.
Type into the prompt bar (placeholder: "Generate or edit assets. Navigate prompt history with \[ALT + Arrow Keys]"). Use `⌥` (Alt) + arrow keys to step through your prompt history. Click the enhance-prompt button to expand a short idea into a fuller prompt.
The model chip shows the current model; click **Add Models** to pick another. Use the type icons to choose image, video or audio, the aspect menu (**Auto-select**, **Square (1:1)**, **Landscape (16:9)**, **Portrait (9:16)**, **Standard (4:3)**, **Portrait (3:4)**, **Cinematic (21:9)**), and the variants selector, which reads **Auto** unless you set a number.
Click send. New nodes appear with a **Generating…** status and fill in when ready. The bar also edits assets: select a node and describe the change.
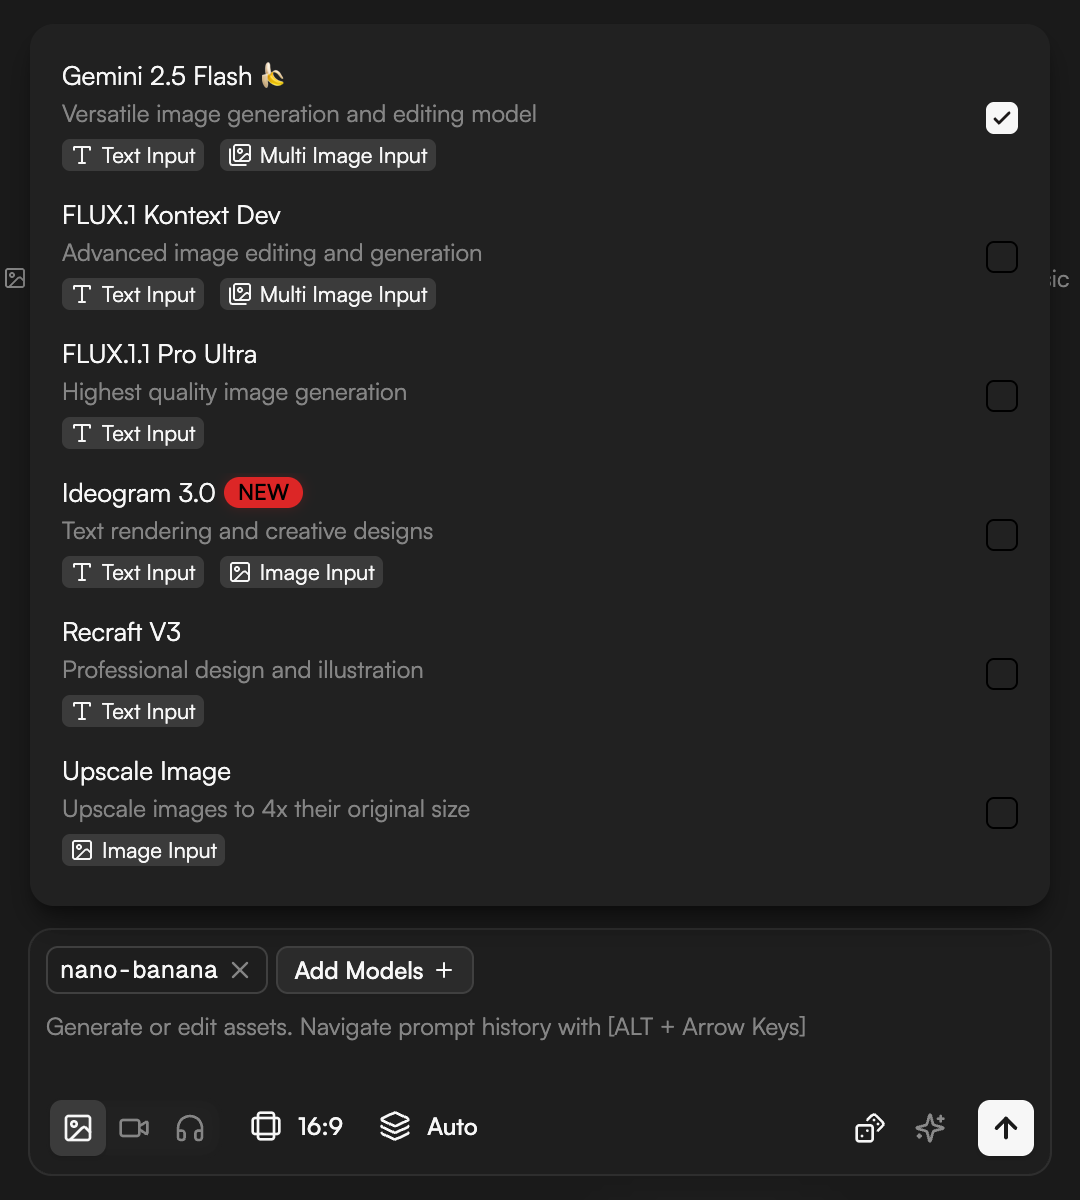 Credit costs are the same as in the chat. See [Generate images](/editor/generate-images) and [Generate video](/editor/generate-video) for the models and what they're good at.
## Node actions
Select a node to work with it. From a node you can make more takes of the same prompt, turn an image into a video clip, upscale it, add sound to a silent clip, or add it to the Media pool. The same requests work in the chat ("animate the second option", "upscale the one on the left"), which is often faster.
## Get shots onto the timeline
* **Drag a node.** Drag it from the board onto the timeline, or add it to the Media pool first and place it from there.
* **Assemble.** Once each Scene frame holds the shot you want, ask the agent to assemble the scenes on the timeline in order.
## Ask the agent
The agent edits the board through the `canvas-edit` skill. It creates, renames, reorders and removes Scene frames, places media and notes, and shows placeholders on the board while generations run.
```text theme={null}
Build a 6-scene storyboard for a 30-second coffee brand promo: hook, problem, product, proof, lifestyle, CTA.
```
```text theme={null}
Generate two image options in each Scene frame, 16:9, and add a note with the camera move.
```
```text theme={null}
Move the CTA scene to the end and remove the unused nodes.
```
```text theme={null}
/storyboard
```
`/storyboard` runs the `storyboard-preview` skill: a review-ready storyboard of the current project, one card per shot. `/director` goes further and runs the whole pipeline (Concept → Structure → Draft → Refine → Polish → Export), generating reference images and shots into the board and assembling them.
## Tips
* One idea per Scene frame. Put recurring details (character description, palette, "golden hour") in a text note inside the frame so every generation repeats them.
* Vary shot size between neighboring scenes: wide, then medium, then close.
* Roughly one scene per 3 to 5 seconds of target length. A 30-second promo is 6 to 10 frames.
* Generate 2 to 4 variants, pick one per scene, then assemble. Iterate on the board, not on the timeline.
## Related
* [Generate images](/editor/generate-images)
* [Generate video](/editor/generate-video)
* [Skills and workflows](/editor/skills)
* [Timeline basics](/editor/timeline-basics)
Credit costs are the same as in the chat. See [Generate images](/editor/generate-images) and [Generate video](/editor/generate-video) for the models and what they're good at.
## Node actions
Select a node to work with it. From a node you can make more takes of the same prompt, turn an image into a video clip, upscale it, add sound to a silent clip, or add it to the Media pool. The same requests work in the chat ("animate the second option", "upscale the one on the left"), which is often faster.
## Get shots onto the timeline
* **Drag a node.** Drag it from the board onto the timeline, or add it to the Media pool first and place it from there.
* **Assemble.** Once each Scene frame holds the shot you want, ask the agent to assemble the scenes on the timeline in order.
## Ask the agent
The agent edits the board through the `canvas-edit` skill. It creates, renames, reorders and removes Scene frames, places media and notes, and shows placeholders on the board while generations run.
```text theme={null}
Build a 6-scene storyboard for a 30-second coffee brand promo: hook, problem, product, proof, lifestyle, CTA.
```
```text theme={null}
Generate two image options in each Scene frame, 16:9, and add a note with the camera move.
```
```text theme={null}
Move the CTA scene to the end and remove the unused nodes.
```
```text theme={null}
/storyboard
```
`/storyboard` runs the `storyboard-preview` skill: a review-ready storyboard of the current project, one card per shot. `/director` goes further and runs the whole pipeline (Concept → Structure → Draft → Refine → Polish → Export), generating reference images and shots into the board and assembling them.
## Tips
* One idea per Scene frame. Put recurring details (character description, palette, "golden hour") in a text note inside the frame so every generation repeats them.
* Vary shot size between neighboring scenes: wide, then medium, then close.
* Roughly one scene per 3 to 5 seconds of target length. A 30-second promo is 6 to 10 frames.
* Generate 2 to 4 variants, pick one per scene, then assemble. Iterate on the board, not on the timeline.
## Related
* [Generate images](/editor/generate-images)
* [Generate video](/editor/generate-video)
* [Skills and workflows](/editor/skills)
* [Timeline basics](/editor/timeline-basics)