> ## Documentation Index
> Fetch the complete documentation index at: https://docs.goframe.dev/llms.txt
> Use this file to discover all available pages before exploring further.
# Transitions
> The 19 video transitions by category, how to drop them onto a cut from Toolbox & VFX, and the Transition inspector controls
A transition blends the end of one clip into the start of the next instead of a hard cut. GoFrame Editor ships 19 video transitions in five families. You drop them onto a cut, adjust them in the Inspector, and the agent can add them for you in bulk.
 ## Add a transition
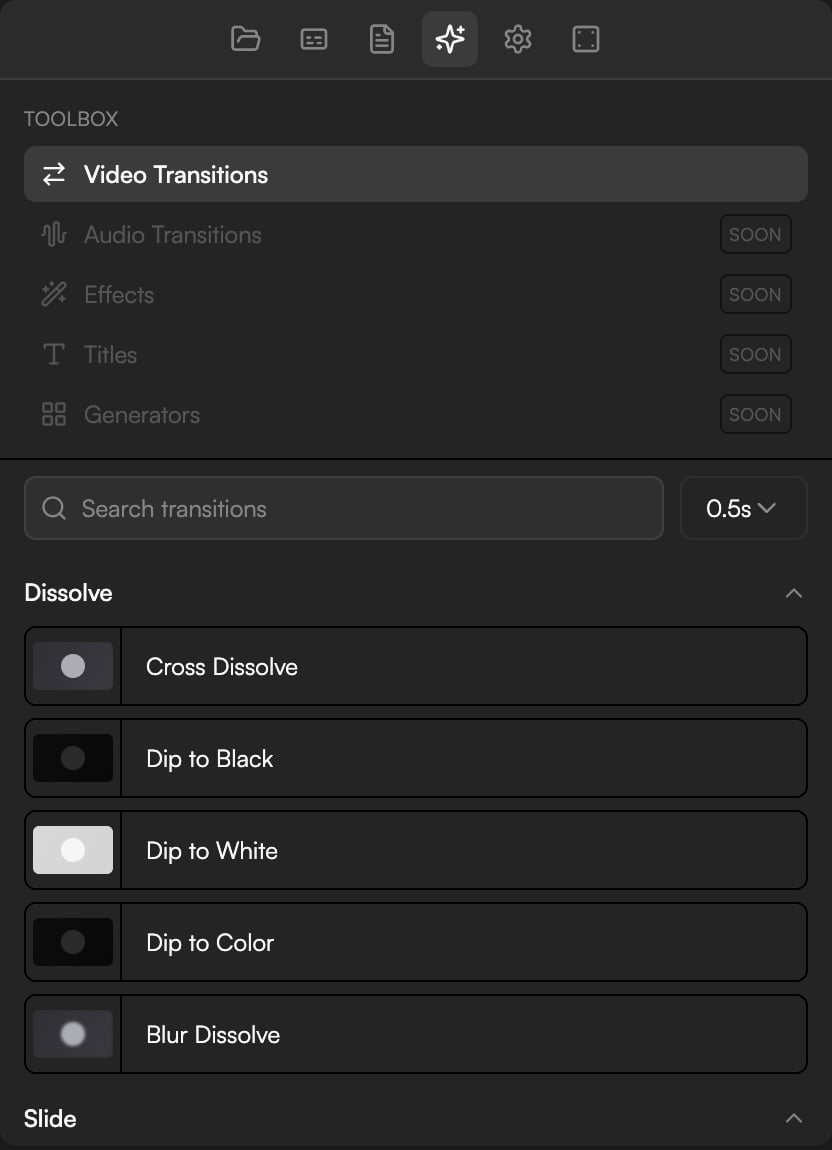
 In the **Editor** layout open **Toolbox & VFX** from the left panel bar and select **Video Transitions** in the **TOOLBOX** list. Transitions are grouped by category (**Dissolve**, **Slide**, **Push**, **Wipe**, **Zoom**); click a group header to collapse or expand it. Type in **Search transitions** to filter the list.
The duration picker next to the search field (it reads **0.5s** by default) sets how long a newly dropped transition lasts: 0.25, 0.5, 1 or 2 seconds. You can change any transition afterwards.
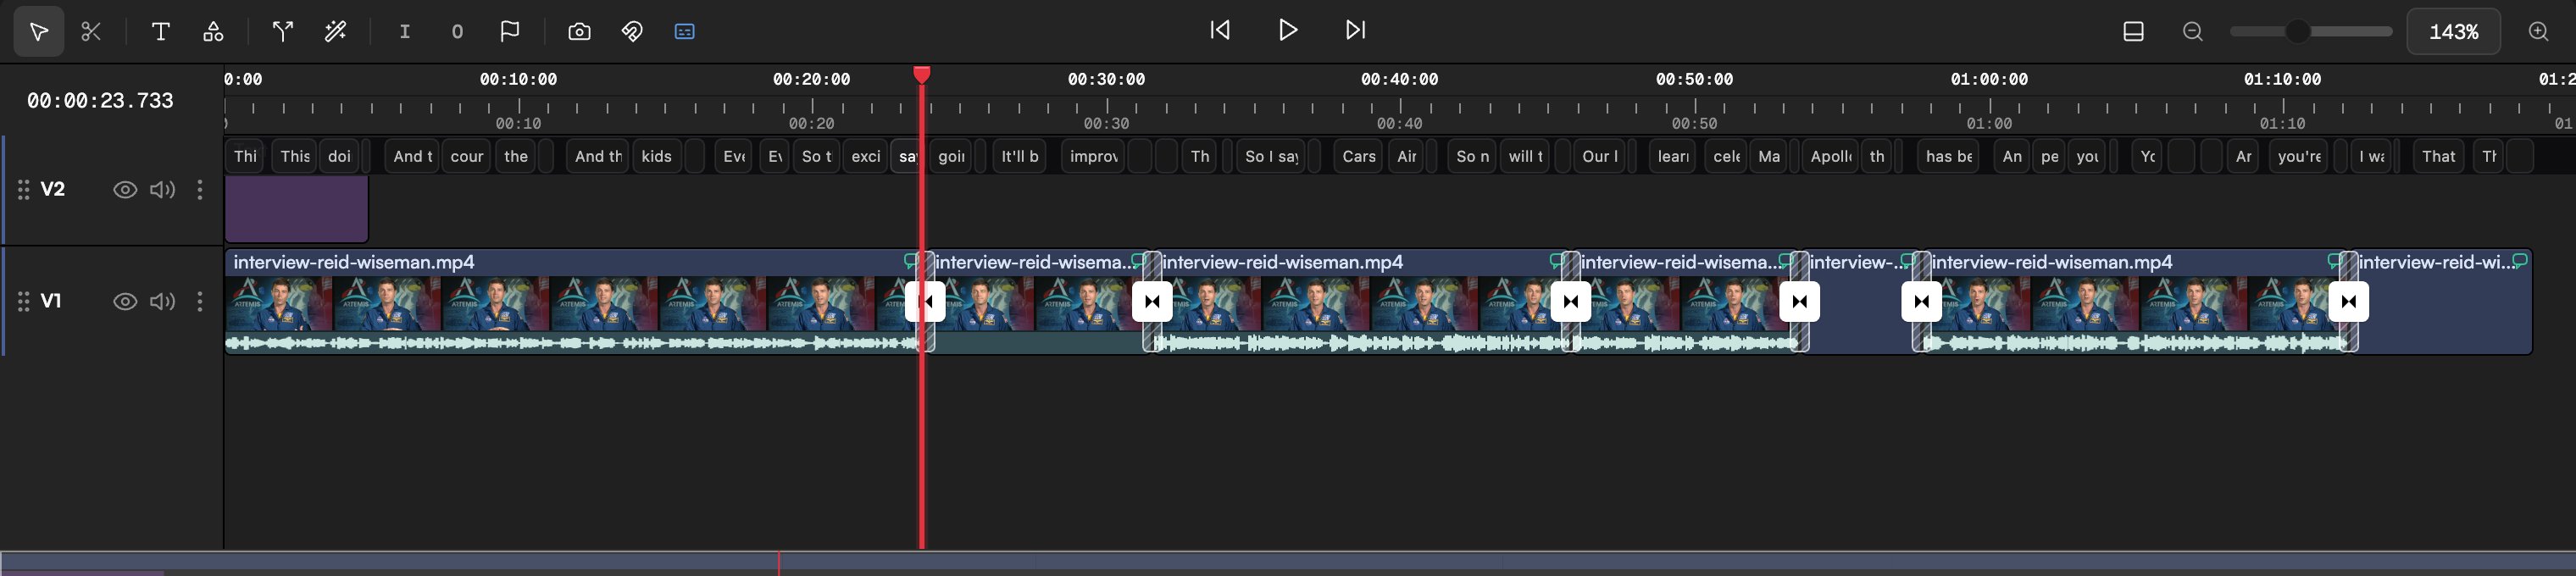
Drag a transition from the list onto the join between two clips on a video track and release. A transition icon appears at the cut.
In the **Editor** layout open **Toolbox & VFX** from the left panel bar and select **Video Transitions** in the **TOOLBOX** list. Transitions are grouped by category (**Dissolve**, **Slide**, **Push**, **Wipe**, **Zoom**); click a group header to collapse or expand it. Type in **Search transitions** to filter the list.
The duration picker next to the search field (it reads **0.5s** by default) sets how long a newly dropped transition lasts: 0.25, 0.5, 1 or 2 seconds. You can change any transition afterwards.
Drag a transition from the list onto the join between two clips on a video track and release. A transition icon appears at the cut.
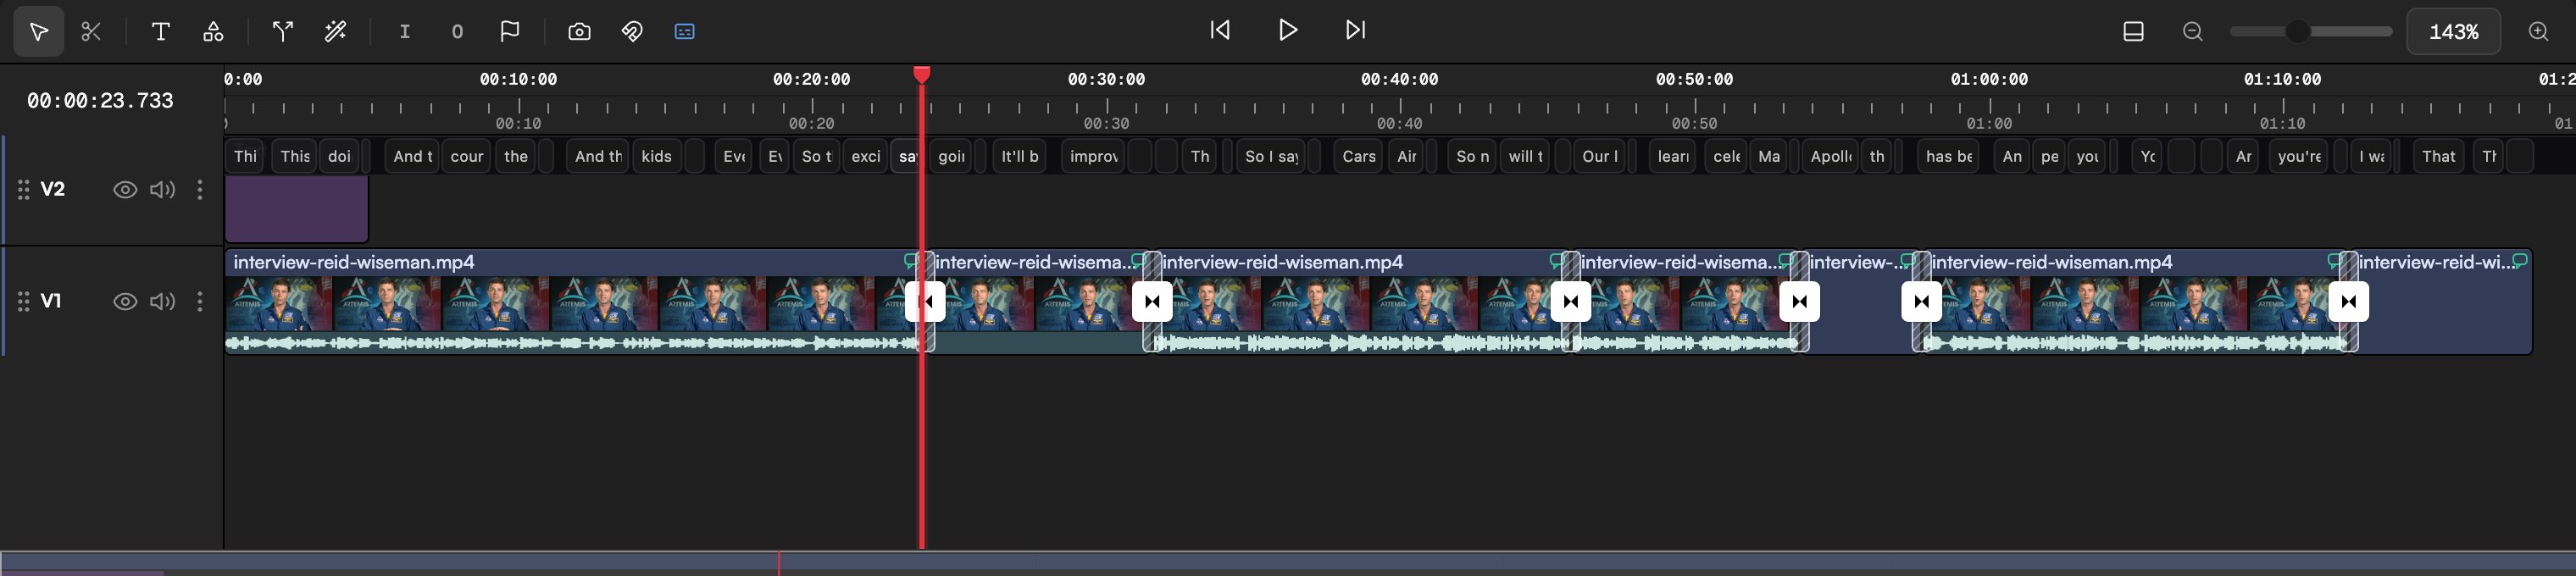 A transition needs a real cut: two clips next to each other on the same track, touching. If there is a gap, close it first (drag the clip, or use ripple delete or ripple trim; see [Edit clips](/editor/edit-clips)). The transition is centred on the cut, so half of it plays over the end of the outgoing clip and half over the start of the incoming one.
Click the star on a transition to mark it as a favourite so it is easy to find again.
## Catalogue
### Dissolve
| Transition | What it does | Extra control |
| ------------------ | ---------------------------------------------------------------------- | ------------- |
| **Cross Dissolve** | Outgoing clip fades into the incoming clip. The workhorse dissolve. | — |
| **Dip to Black** | Fades to black at the cut, then fades up into the next clip. | — |
| **Dip to White** | Fades to white at the cut, then fades up into the next clip. | — |
| **Dip to Color** | Fades to a custom colour at the cut, then fades up into the next clip. | **Color** |
| **Blur Dissolve** | Cross dissolve with a blur ramp peaking at the cut. | — |
### Slide
The incoming clip slides in over the outgoing one, which stays still.
| Transition | What it does | Extra control |
| --------------------- | --------------------------------------------------------------- | ------------- |
| **Slide from Left** | Incoming clip slides in from the left over the outgoing clip. | — |
| **Slide from Right** | Incoming clip slides in from the right over the outgoing clip. | — |
| **Slide from Top** | Incoming clip slides in from the top over the outgoing clip. | — |
| **Slide from Bottom** | Incoming clip slides in from the bottom over the outgoing clip. | — |
### Push
Both clips move together, as if the new one shoves the old one off screen.
| Transition | What it does | Extra control |
| -------------- | -------------------------------------------------------- | ------------- |
| **Push Left** | Incoming clip pushes the outgoing clip out to the left. | — |
| **Push Right** | Incoming clip pushes the outgoing clip out to the right. | — |
| **Push Up** | Incoming clip pushes the outgoing clip out upward. | — |
| **Push Down** | Incoming clip pushes the outgoing clip out downward. | — |
### Wipe
| Transition | What it does | Extra control |
| -------------- | -------------------------------------------------- | ------------- |
| **Wipe Left** | Incoming clip is revealed by a right-to-left wipe. | **Softness** |
| **Wipe Right** | Incoming clip is revealed by a left-to-right wipe. | **Softness** |
| **Wipe Up** | Incoming clip is revealed by a bottom-to-top wipe. | **Softness** |
| **Wipe Down** | Incoming clip is revealed by a top-to-bottom wipe. | **Softness** |
### Zoom
| Transition | What it does | Extra control |
| -------------- | --------------------------------------------------------------------------- | ------------- |
| **Iris** | Incoming clip is revealed by an expanding circle from the centre. | **Softness** |
| **Cross Zoom** | Outgoing clip zooms in while dissolving into the incoming clip zooming out. | — |
## Adjust a transition
Click the transition on the Timeline to open it in the Inspector under the **Transition** header.
A transition needs a real cut: two clips next to each other on the same track, touching. If there is a gap, close it first (drag the clip, or use ripple delete or ripple trim; see [Edit clips](/editor/edit-clips)). The transition is centred on the cut, so half of it plays over the end of the outgoing clip and half over the start of the incoming one.
Click the star on a transition to mark it as a favourite so it is easy to find again.
## Catalogue
### Dissolve
| Transition | What it does | Extra control |
| ------------------ | ---------------------------------------------------------------------- | ------------- |
| **Cross Dissolve** | Outgoing clip fades into the incoming clip. The workhorse dissolve. | — |
| **Dip to Black** | Fades to black at the cut, then fades up into the next clip. | — |
| **Dip to White** | Fades to white at the cut, then fades up into the next clip. | — |
| **Dip to Color** | Fades to a custom colour at the cut, then fades up into the next clip. | **Color** |
| **Blur Dissolve** | Cross dissolve with a blur ramp peaking at the cut. | — |
### Slide
The incoming clip slides in over the outgoing one, which stays still.
| Transition | What it does | Extra control |
| --------------------- | --------------------------------------------------------------- | ------------- |
| **Slide from Left** | Incoming clip slides in from the left over the outgoing clip. | — |
| **Slide from Right** | Incoming clip slides in from the right over the outgoing clip. | — |
| **Slide from Top** | Incoming clip slides in from the top over the outgoing clip. | — |
| **Slide from Bottom** | Incoming clip slides in from the bottom over the outgoing clip. | — |
### Push
Both clips move together, as if the new one shoves the old one off screen.
| Transition | What it does | Extra control |
| -------------- | -------------------------------------------------------- | ------------- |
| **Push Left** | Incoming clip pushes the outgoing clip out to the left. | — |
| **Push Right** | Incoming clip pushes the outgoing clip out to the right. | — |
| **Push Up** | Incoming clip pushes the outgoing clip out upward. | — |
| **Push Down** | Incoming clip pushes the outgoing clip out downward. | — |
### Wipe
| Transition | What it does | Extra control |
| -------------- | -------------------------------------------------- | ------------- |
| **Wipe Left** | Incoming clip is revealed by a right-to-left wipe. | **Softness** |
| **Wipe Right** | Incoming clip is revealed by a left-to-right wipe. | **Softness** |
| **Wipe Up** | Incoming clip is revealed by a bottom-to-top wipe. | **Softness** |
| **Wipe Down** | Incoming clip is revealed by a top-to-bottom wipe. | **Softness** |
### Zoom
| Transition | What it does | Extra control |
| -------------- | --------------------------------------------------------------------------- | ------------- |
| **Iris** | Incoming clip is revealed by an expanding circle from the centre. | **Softness** |
| **Cross Zoom** | Outgoing clip zooms in while dissolving into the incoming clip zooming out. | — |
## Adjust a transition
Click the transition on the Timeline to open it in the Inspector under the **Transition** header.
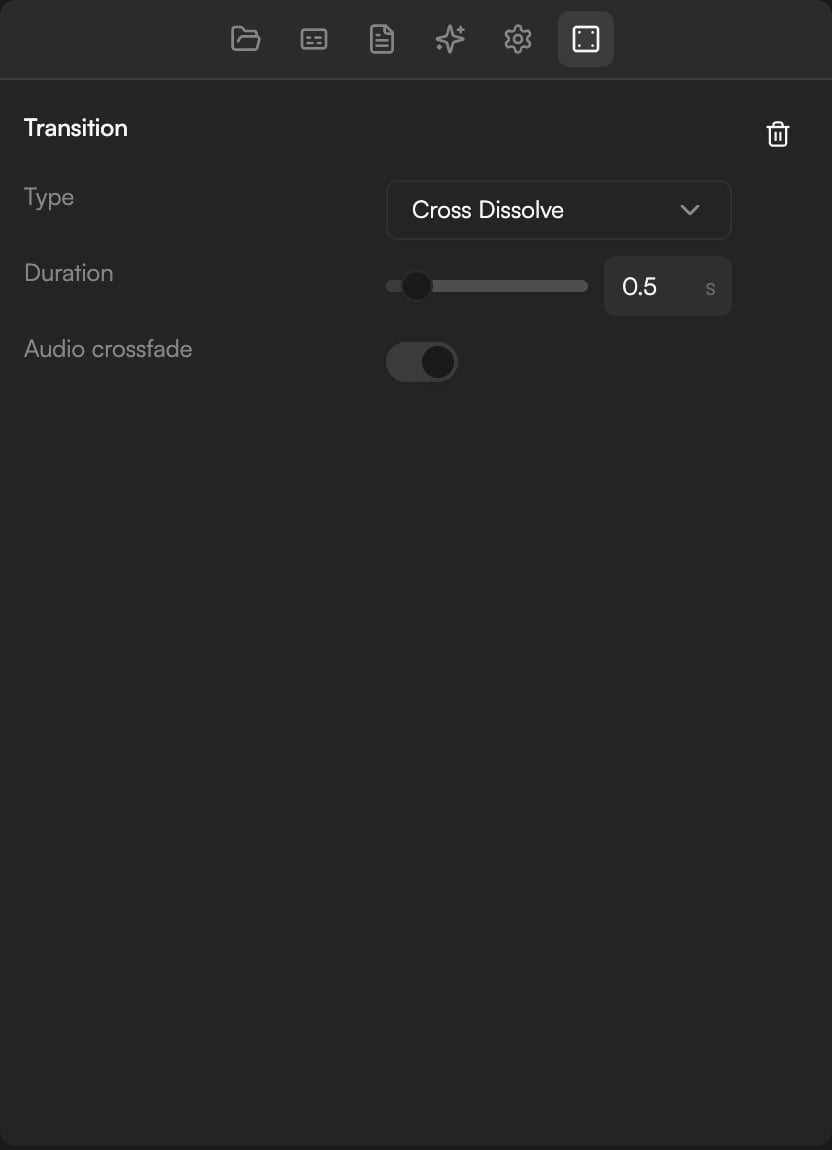 * **Type**: switch to any other transition from the dropdown.
* **Duration**: a slider with the value in seconds next to it (0.5 s for a freshly dropped transition). The minimum is 2 frames.
* **Softness** (wipes and Iris only): from a hard edge to a wide feathered edge.
* **Color** (Dip to Color only): the colour the picture dips through.
* **Audio crossfade**: a switch. When it is on and both clips carry sound, their audio crossfades over the same span as the picture. Turn it off to keep the audio cut hard.
* The trash icon in the header removes the transition.
### Right-click menu
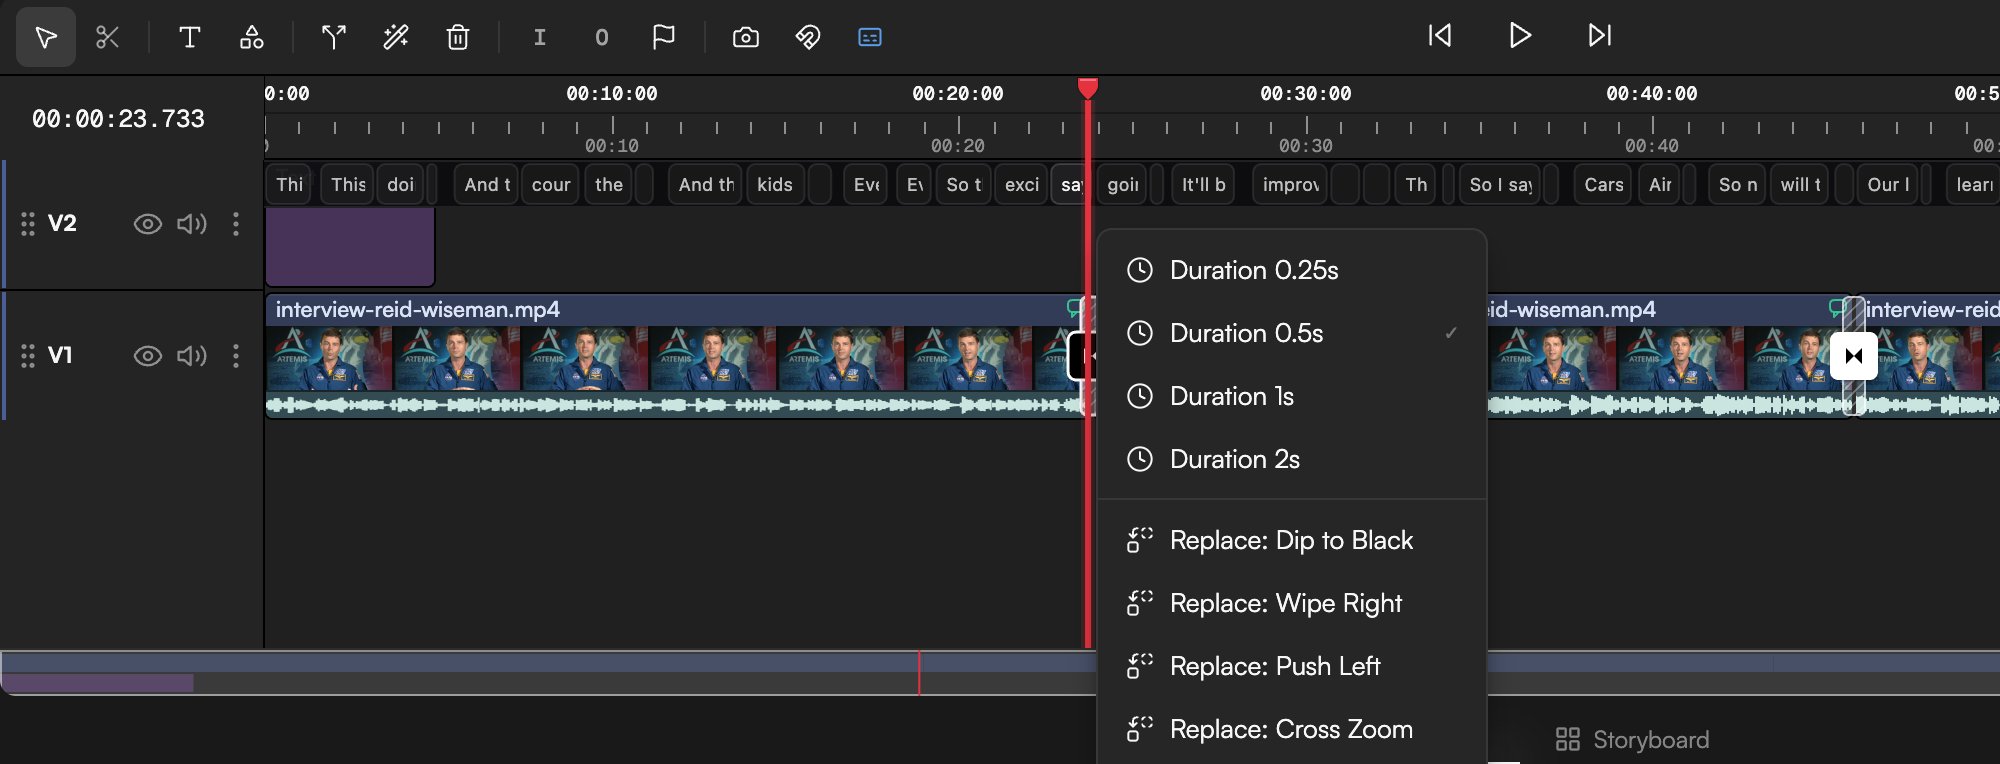
Right-click a transition on the Timeline for the quick menu: **Duration** presets of **0.25s**, **0.5s**, **1s** and **2s**, and **Replace:** entries for common alternatives such as **Replace: Dip to Black**, **Replace: Wipe Right**, **Replace: Push Left** and **Replace: Cross Zoom**. You can also delete the transition from here.
* **Type**: switch to any other transition from the dropdown.
* **Duration**: a slider with the value in seconds next to it (0.5 s for a freshly dropped transition). The minimum is 2 frames.
* **Softness** (wipes and Iris only): from a hard edge to a wide feathered edge.
* **Color** (Dip to Color only): the colour the picture dips through.
* **Audio crossfade**: a switch. When it is on and both clips carry sound, their audio crossfades over the same span as the picture. Turn it off to keep the audio cut hard.
* The trash icon in the header removes the transition.
### Right-click menu
Right-click a transition on the Timeline for the quick menu: **Duration** presets of **0.25s**, **0.5s**, **1s** and **2s**, and **Replace:** entries for common alternatives such as **Replace: Dip to Black**, **Replace: Wipe Right**, **Replace: Push Left** and **Replace: Cross Zoom**. You can also delete the transition from here.
 ## Ask the agent instead
The agent adds, replaces and times transitions from a prompt, which is the fastest way to handle many cuts at once: "Add a 0.5 second cross dissolve on every cut", "Dip to black before the last shot, one second long", "Replace all the dissolves with a 0.25 s wipe right". Each change lands as a **Timeline changes** card you can revert; see [Review proposals and approve actions](/editor/proposals-and-permissions).
Transitions apply to video tracks. For an audio-only cut, animate volume with the **Gain** preset or keyframes instead; see [Animate clips with presets and keyframes](/editor/animation-and-keyframes).
## Continue
* [Edit clips](/editor/edit-clips)
* [Animate clips with presets and keyframes](/editor/animation-and-keyframes)
* [Inspector: clip properties](/editor/inspector)
* [Timeline basics](/editor/timeline-basics)
## Ask the agent instead
The agent adds, replaces and times transitions from a prompt, which is the fastest way to handle many cuts at once: "Add a 0.5 second cross dissolve on every cut", "Dip to black before the last shot, one second long", "Replace all the dissolves with a 0.25 s wipe right". Each change lands as a **Timeline changes** card you can revert; see [Review proposals and approve actions](/editor/proposals-and-permissions).
Transitions apply to video tracks. For an audio-only cut, animate volume with the **Gain** preset or keyframes instead; see [Animate clips with presets and keyframes](/editor/animation-and-keyframes).
## Continue
* [Edit clips](/editor/edit-clips)
* [Animate clips with presets and keyframes](/editor/animation-and-keyframes)
* [Inspector: clip properties](/editor/inspector)
* [Timeline basics](/editor/timeline-basics)