


Tools
The toolbar starts with two tools:- Select tool (
V): the default. Click, drag, trim and marquee-select. - Blade tool (
B): the pointer turns into a cutter. Click a clip to split it at that point. PressVto return to selecting.
Select
- Click a clip to select it.
⇧-click adds more clips to the selection. - Drag on an empty part of the Timeline to draw a marquee and select everything it touches.
- Click an empty area to clear the selection. The Inspector always shows the selected clip.
Move
Drag a clip along its track to change when it plays, or up and down to move it to another track. A clip keeps its type rules: video, images, text and shapes go on video tracks, audio on audio tracks. Drop below the last track onto + New video track or + New audio track to create a track on the way. With snapping on (N), the clip’s edges snap to other clips, the playhead and markers as you drag.
Trim
Drag the left or right edge of a clip to shorten or lengthen it. For video and audio you can only extend as far as the source file allows. Hold⇧ while you drag an edge for a ripple trim: every clip after it on the same track shifts to keep the cut tight, so no gap opens and no overlap appears.
Split
⇧B, the split button in the toolbar, or Split at Playhead in the clip’s right-click menu cuts at the playhead.- The Blade tool (
B) cuts wherever you click.
Delete and ripple delete
⌫/Delete, the delete button that appears in the toolbar when something is selected, or Delete in the right-click menu removes the selection and leaves a gap.⇧⌫or Ripple Delete removes the selected clip and pulls every later clip on that track left by the same length, closing the gap.
Duplicate, copy and paste
⌘Dor Duplicate places a copy of the selection right after the original on the same track.⌘Ccopies the selection;⌘Vpastes it at the playhead on the same tracks. Right-click an empty spot and choose Paste Here to paste at the click position instead.
Rename
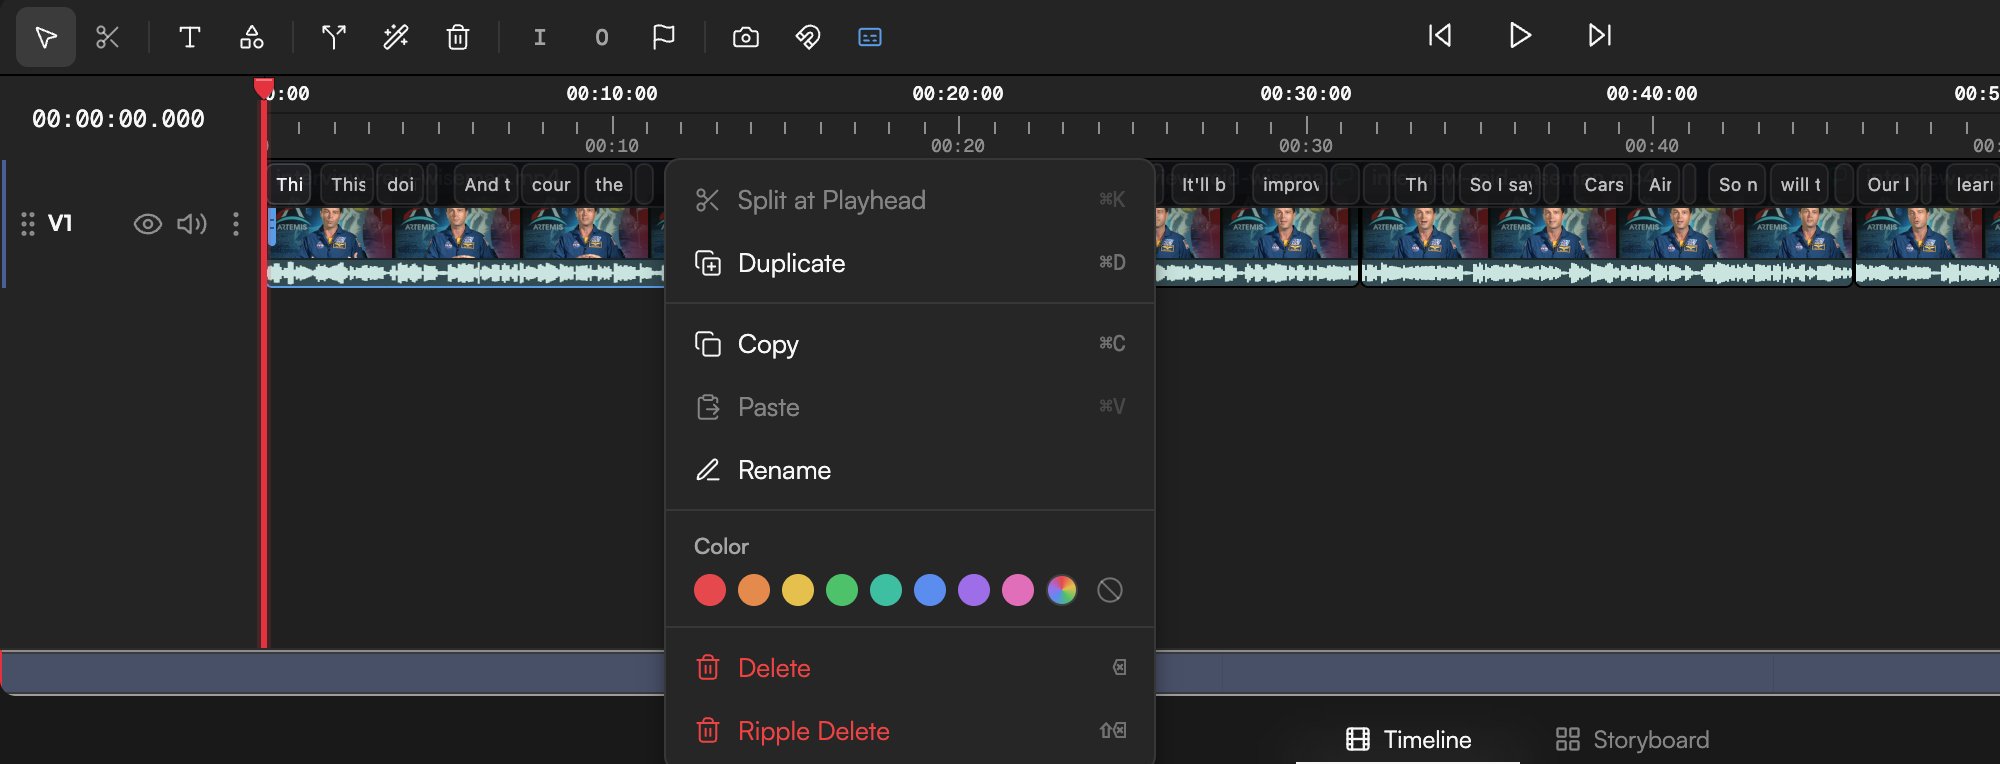
Double-click a clip to rename it inline, or choose Rename from its right-click menu. Names only help you and the agent tell clips apart; they do not affect export. Color in the same menu tints the clip with one of eight swatches (or clears the colour) so related clips stand out on the Timeline.The clip menu
Right-click any clip for: Split at Playhead (⇧B in the default preset; the menu may show a different key hint), Duplicate (⌘D), Copy (⌘C), Paste (⌘V), Rename, Color, Delete (⌫) and Ripple Delete (⇧⌫). Right-clicking a transition shows a different menu; see Transitions.
Right-click an empty area for Add Marker, Paste Here, Add Text, Add Shape, Clear In/Out and Zoom to Fit.
Status badges
A clip can show a badge while something is still happening to its media: Uploading, Transcoding, Transcribing, Generating, AI processing or Error. You can keep editing around it; the badge disappears when the job finishes. When the agent is changing the Timeline, a chip reads AI editing N clips over the affected clips. See Import media and Transcribe media for what each state means.Undo and redo
⌘Z undoes and ⌘⇧Z redoes; the top bar has Undo and Redo buttons too. The history keeps 50 steps and includes agent edits, so you can step back through a change the agent made. For anything older, use Version history or ask the agent to /undo.
Remove Silences
Select a video or audio clip that has sound, open Smart actions (the wand in the toolbar) and choose Remove Silences. GoFrame Editor cuts the quiet stretches out of the clip and tightens what is left. The action needs a clip with audio. For more control over how aggressive the cut is, work from the Transcript panel or ask the agent (“remove pauses longer than a second”).There is no slip or slide tool and no clip grouping yet. To move several clips together, select them all and drag.