

Start an export
1
Open the dialog
Click Export in the top bar or press
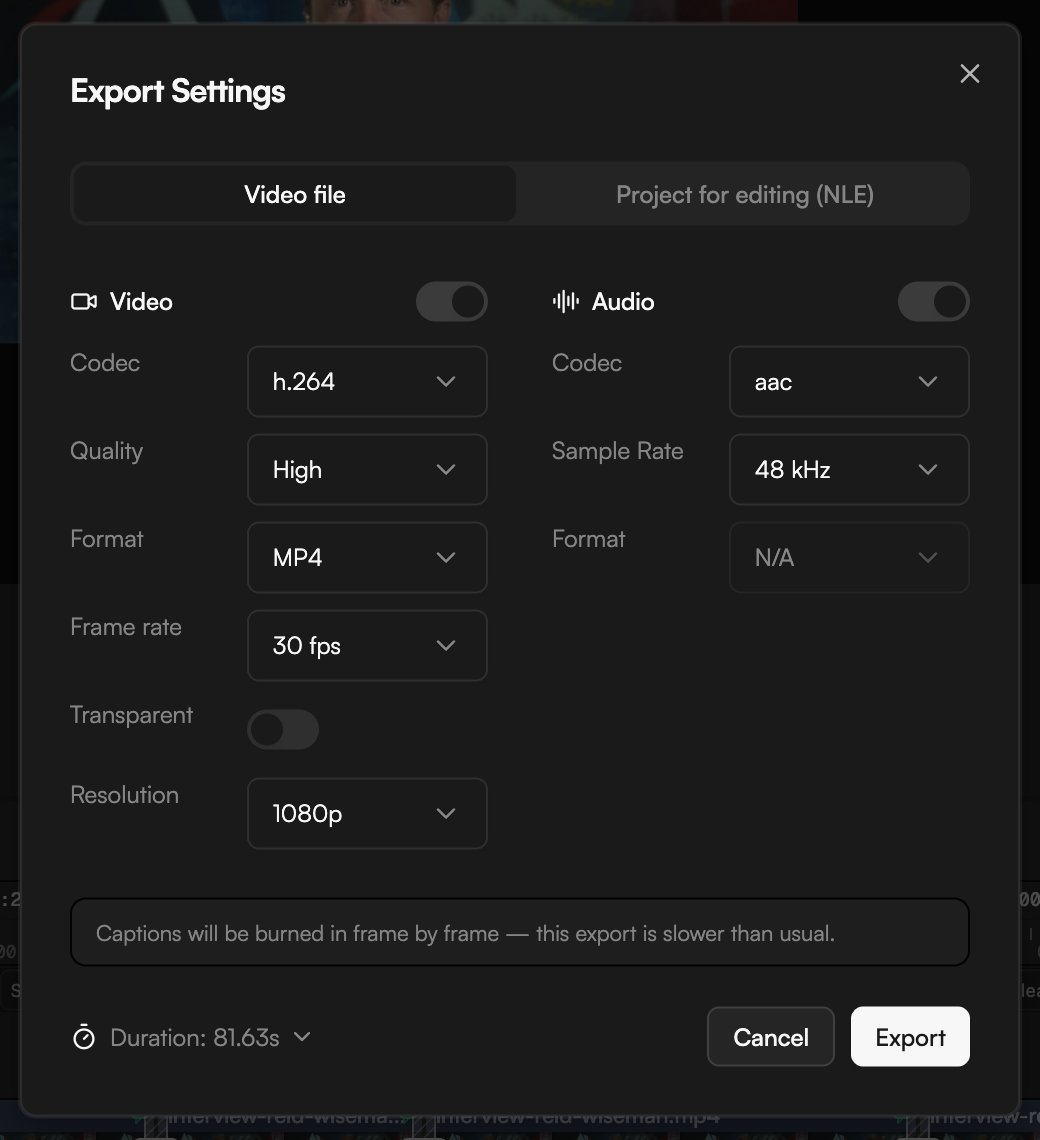
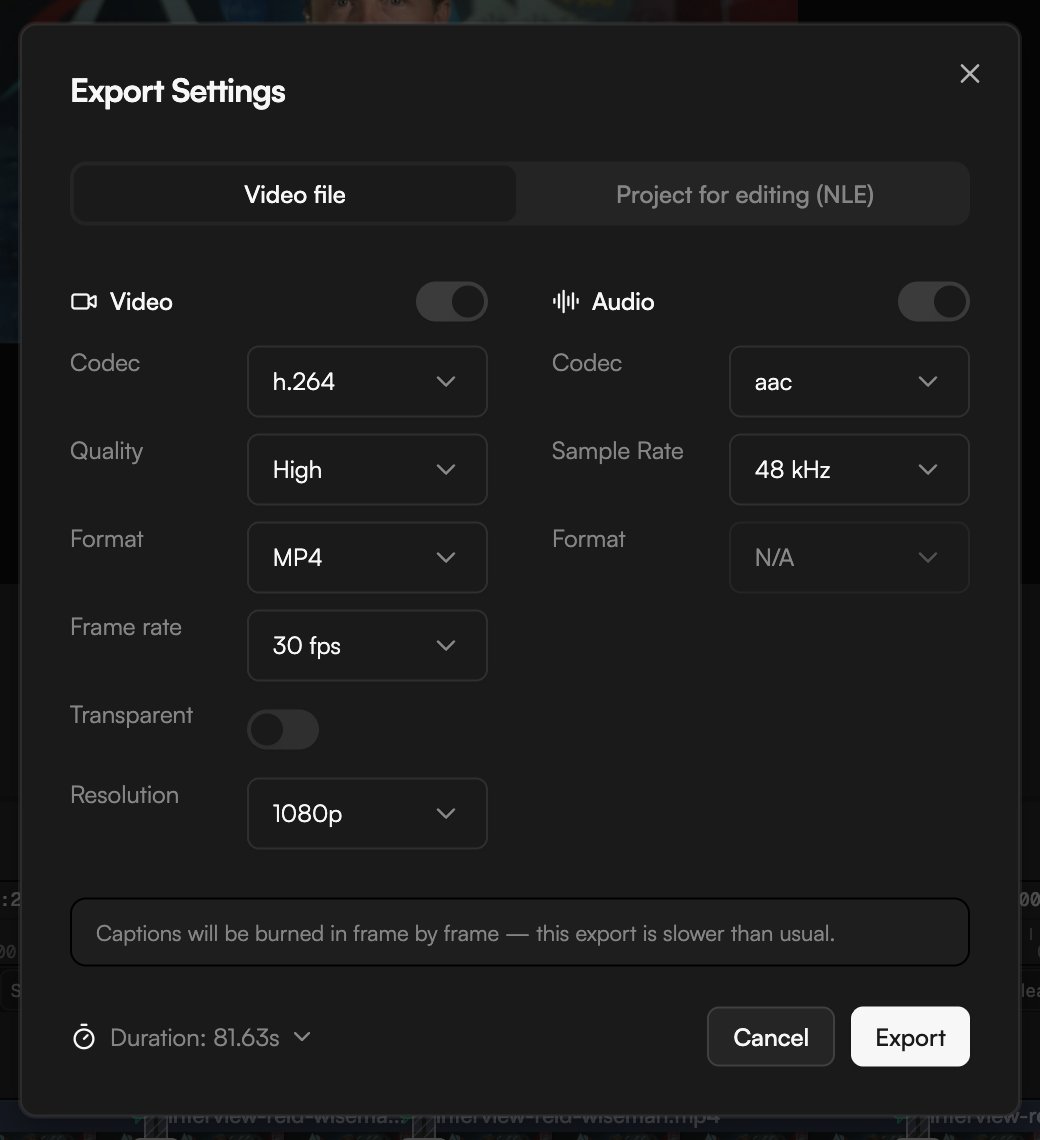
⌘E (Ctrl on Windows). The Export Settings dialog opens.2
Choose the output
Keep the Video file tab selected. Project for editing (NLE) exports a project file for Final Cut Pro, Premiere Pro or DaVinci Resolve instead; see Export for Final Cut, Premiere and Resolve.
3
Set quality, format and resolution
Adjust the Video and Audio sections. The defaults (Codec h.264, Quality High, Format MP4, Frame rate 30 fps, Resolution 1080p; audio Codec aac at a Sample Rate of 48 kHz) work for most uploads.
4
Export
Check the Duration at the bottom, then click Export. In Chrome and Edge a save dialog asks where to put the file; other browsers download it. The dialog shows progress while it renders and tells you when the file is ready. Cancel stops the export.
Video settings
Resolution depends on your plan: Free exports up to 720p, Creator up to 1080p, and Pro up to 4K. See Plans and credits.
Formats and codecs
Audio settings
- Codec follows the video format: aac or opus for MP4, opus for WebM and OGG.
- Sample Rate: 8, 12, 16, 24 or 48 kHz. Leave it at 48 kHz unless a platform asks for less.
- Format reads N/A for a video export, because the audio goes inside the video container.
Transparent export
Turn on Transparent to render the timeline with an alpha channel, for example a lower third or a motion graphic you will composite elsewhere. Enabling it switches the format to WebM with vp9, then offers two encoders:- WebM: VP9 with alpha. Fast and browser-friendly.
- ProRes: ProRes 4444 in a
.movcontainer. Clean 10-bit straight alpha for Premiere, Resolve or After Effects. Slower and larger.
MP4 cannot carry an alpha channel. If you switch the format back to MP4 or OGG, Transparent turns off. Transparent export is available on Creator and Pro; on Free the switch is locked.
Export part of the timeline
By default the whole timeline is exported. The Duration dropdown at the bottom of the dialog shows the current length (for example Duration: 81.63s) and lets you choose between the whole composition and stopping at one of your markers:- Keep the whole composition to export the full length.
- Pick a marker to end the export at that marker’s time. Add markers from the timeline toolbar or with
Mfirst.
Captions and motion graphics
Captions and motion graphics are burned into the picture frame by frame. When the project has them, the dialog notes “Captions will be burned in frame by frame — this export is slower than usual.” Motion graphics are prepared before the render starts; turning on MG optimization in the Media pool does that work in the background ahead of time. See Motion graphics and Captions.Collaborators during an export
While an export runs, changes from the agent and your collaborators are held back until it finishes; your own edits still apply. Their edits arrive after the file is written.Watermark on the Free plan
On the Free plan the dialog shows “Free plan: exports include a small watermark.” and every render carries a “Made with Goframe” mark. Click Upgrade to remove, or open Plans and credits.Export a single frame
To save the current frame as a PNG, place the playhead and click the Export frame camera button in the timeline toolbar. Useful for thumbnails and stills.Ask the agent to export
You can also type the request in chat: “Export this as a 1080p MP4” or run/export-video. The agent renders the timeline and posts a download link in the conversation. Agent exports have a 15-minute limit; for long or 4K projects, use the dialog.
Troubleshooting
- The timeline is empty: drop at least one clip on the timeline before exporting.
- Transparent export needs WebM (VP9) or MOV (ProRes 4444): pick WebM or switch to ProRes.
- Export was cancelled or failed: check that no clips show Error badges, keep the tab in the foreground, and try a lower resolution. More in Troubleshooting.